 |
||
|
HP Service Manager Integration with BSM Components
The purpose of this guide is to provide the procedures required to configure the integration of Business Service Management components Service Health, Service Level Management, or Alerts with HP Service Manager.
Summary of the Integration Capabilities
Integration Flowchart
The following flowchart represents the integration:
Back to the top of the support matrix
Select Integration Conditions
Select options below. The document below the options section is filtered according to your selections, creating an integration procedure that is tailored to your individual situation. After you choose your options, you can print the instructions and continue with the procedure.
If you work online and you click a link internal to the document, right-click and select Back to return to the previous location.
Note: The integration of HP Service Manager 7.01 and the capability to display the Planned Changes and Incidents tab in the 360° View page in Service Health in Business Service Management 9.00 is not supported.
HP Service Manager Integration Overview
HP Service Manager software is a comprehensive and fully integrated IT service management suite that helps you decrease the time it takes to resolve problems. ITIL-based best practices and a highly scalable service-oriented architecture let you deploy consistent, integrated processes throughout your IT organization. HP Service Manager provides the following capabilities:
- Automate service management processes for incident, problem, change, configuration, availability, release, contract, catalog-based requests and service level management.
- Use built-in workflows to document, route and escalate issues for IT service management processes.
- Gain access to comprehensive configuration data through a powerful Universal CMDB (Universal Configuration Management database).
- Deploy solution easily across heterogeneous environments using an open architecture and Web-based framework.
This section describes the concepts related to the integration conditions you selected earlier.
Understanding the Integration with Service Health and Service Level Management
This section describes the concepts for the integration of HP Service Manager with Service Health and Service Level Management.
Note: Only incidents for which you select a CI in the Configuration Item field in the Associated CI tab and enter Business Service in the Type field when opening the incident are retrieved by EMS. The CI listed in the Configuration Item field represents an incident-related item.
Integration with EMS
This section describes the capabilities provided by the integration of Business Service Management and HP Service Manager with the EMS option.
Architecture
The architecture of the integration of Service Health and Service Level Management with HP Service Manager is as follows:
You can work with one or more of the following options:
- Number of Open Incidents KPI. You can view the Number of Open Incidents KPI (based on data from HP Service Manager) at the business service level in the BSM Service Health views and reports. For details about the views, click Views or see "View Topology" in Using Service Health. For example: the Operator/Application support can get visibility and alerts based on the Number of Open Incidents in BSM Service Health alongside operational KPIs.
- Drill down to HP Service Manager from EMS monitor level CIs. You can drill down from Service Health views at the EMS monitor level to HP Service Manager to view the details of the related incidents. For details about the available drill downs, click here or see "Service Health Menu Options" in Using Service Health. For example: the support person can drill down to HP Service Manager to view the details on the open incidents of the selected service. Based on the number of incidents and their details, the support person can prioritize the issues that are the most important.
The assignment of the Service Manager EMS integration enriches the relevant CIs with the appropriate KPIs, rules, and context menus that are to be assigned automatically to the CIs when the condition occurs, and the assignment is running. For details, click EMS Integrations Application Overview or see "Integration Administration Application Overview" in Solutions and Integrations.
Defining SLAs
You can define SLAs based on the serviceability KPIs (MTTR, MTBF, or MTBSI KPIs) that are calculated based on incidents that come from HP Service Manager. For details, click Agreements or see "How to Define an SLA in the SLA Wizard - Use-Case Scenario" in Using Service Level Management.
For example: the HP Service Manager manages SLAs with operational KPIs (Availability, Performance, or other KPIs) and serviceability KPIs (MTTR, MTBF, or MTBSI KPIs) using BSM Service Level Management. The HP Service Manager can review the SLAs statuses according to the service Availability, Performance, MTTR, and MTBF side-by-side.
Elements Created in the View by the Integration with HP Service Manager
The HP Service Manager integration creates the following elements:
Understanding the Integration with Service Health and Service Level Management
This section describes the concepts for the integration of HP Service Manager with Service Health and Service Level Management.
Note: Only incidents for which you select a CI in the Affected CI field when opening the incident are retrieved by EMS. The CI listed in the Affected CI field represents an incident-related item.
Integration with EMS
This section describes the capabilities provided by the integration of BSM and HP Service Manager with the EMS option.
Architecture
The architecture of the integration of Service Health and Service Level Management with HP Service Manager is as follows:
You can work with one or more of the following options:
- Number of Open Incidents KPI. You can view the Number of Open Incidents KPI (based on data from HP Service Manager) at the business service level in the BSM Service Health views and reports. For details about the views, click Views (for BAC 8.0x) or see "Views" in Using Service Health for other versions of BAC. For example: the Operator/Application support can get visibility and alerts based on the Number of Open Incidents in BSM Service Health alongside operational KPIs.
- Drill down to HP Service Manager from EMS monitor level CIs. You can drill down from Service Health views at the EMS monitor level to HP Service Manager to view the details of the related incidents. For details about the available drill downs, click here or see "Service Health Menu Options" in Using Service Health. For example: the support person can drill down to HP Service Manager to view the details on the open incidents of the selected service. Based on the number of incidents and their details, the support person can prioritize the issues that are the most important.
The assignment of the Service Manager EMS integration enriches the relevant CIs with the appropriate KPIs, rules, and context menus that are to be assigned automatically to the CIs when the condition occurs, and the assignment is running. For details, click EMS Integrations Application Overview (for BAC 8.0x) or see "EMS Integrations Application Overview" in Solutions and Integrations for other versions of BAC.
Defining SLAs
You can define SLAs based on the serviceability KPIs (MTTR, MTBF, or MTBSI KPIs) that are calculated based on incidents that come from HP Service Manager. For details, click Agreements (for BAC 8.0x) or see "Agreements" in Using Service Level Management for other versions of BAC.
For example: the HP Service Manager manages SLAs with operational KPIs (Availability, Performance, or other KPIs) and the MTTR, MTBF, or MTBSI KPIs using BSM Service Level Management. HP Service Manager can review the SLAs statuses according to the service Availability, Performance, MTTR, and MTBF side-by-side.
Elements Created in the View by the Integration with HP Service Manager
The HP Service Manager integration creates the following elements:
Understanding the Integration with Service Health and Service Level Management
This section describes the concepts for the integration of HP Service Manager with Service Health and Service Level Management.
Note: Only incidents for which you select a CI in the Affected CI field when opening the incident are retrieved by EMS. The CI listed in the Affected CI field represents an incident-related item. The default EMS settings only support the monitoring of bizservice CITs.
Integration with EMS
This section describes the capabilities provided by the integration of BSM and HP Service Manager with the EMS option.
Architecture
The architecture of the integration of Service Health and Service Level Management with HP Service Manager is as follows:
You can work with one or more of the following options:
- Number of Open Incidents KPI. You can view the Number of Open Incidents KPI (based on data from HP Service Manager) at the business service level in the BSM Service Health views and reports. For details about the views, click Views (for BAC 8.0x) or see "Views" in Using Service Health for other versions of BAC. For example: the Operator/Application support can get visibility and alerts based on the Number of Open Incidents in BSM Service Health alongside operational KPIs.
- Drill down to HP Service Manager from EMS monitor level CIs. You can drill down from Service Health views at the EMS monitor level to HP Service Manager to view the details of the related incidents. For details about the available drill downs, click here or see "Service Health Menu Options" in Using Service Health. For example: the support person can drill down to HP Service Manager to view the details on the open incidents of the selected service. Based on the number of incidents and their details, the support person can prioritize the issues that are the most important.
The assignment of the Service Manager EMS integration enriches the relevant CIs with the appropriate KPIs, rules, and context menus that are to be assigned automatically to the CIs when the condition occurs, and the assignment is running. For details, click EMS Integrations Application Overview (for BAC 8.0x) or see "EMS Integrations Application Overview" in Solutions and Integrations for other versions of BAC.
Defining SLAs
You can define SLAs based on the serviceability KPIs (MTTR, MTBF, or MTBSI KPIs) that are calculated based on incidents that come from HP Service Manager. For details, click Agreements (for BAC 8.0x) or see "Agreements" in Using Service Level Management for other versions of BAC.
For example: the HP Service Manager manages SLAs with operational KPIs (Application Availability, Application Performance, or other KPIs) and the MTTR, MTBF, or MTBSI KPIs using BSM Service Level Management. HP Service Manager can review the SLAs statuses according to the service Application Availability, Application Performance, MTTR, and MTBF side-by-side.
Elements Created in the View by the Integration with HP Service Manager
The HP Service Manager integration creates the following elements:
Viewing the Planned Changes and Incidents Tab in the 360° View Page in Service Health
This integration enables the display of the Planned Changes and Incidents tab in the 360° View page in Service Health. For details, click Changes and Incidents Tab or see "360° View" in Using Service Health.
Generating Incidents in HP Service Manager when BSM Alert is Triggered - Overview
You can configure specific CI Status alerts, SLA alerts, or EUM alerts to automatically open a corresponding incident in HP Service Manager. The triggered alert forwards a corresponding event to the Event Channel, where the event is changed into an incident and sent, using the Event Forwarding Service, to HP Service Manager to proactively alert the operator about a problem in the system. The alerts are mapped to the events using the Event Template.
Submitting Incidents when BSM Alerts are Triggered (Incident Submission) Using the Legacy URL
You can automatically manage (open, update, or close) an incident in HP Service Manager when a CI Status alert is triggered in BSM.
Data about the alert is passed to HP ServiceCenter/HP Service Manager using the legacy URL.
Opening Incidents in HP Service Manager Using the Legacy URL
You can automatically open an incident in HP Service Manager when a CI Status alert is triggered.
Data about the alert is passed to HP Service Manager and used to open incidents identified by the CI Name. Those parameters are among the parameters passed to HP Service Manager by the alert. An incident previously opened is updated with new alert data when a CI Status alert is triggered with the same identifying information.
The incident is opened in HP Service Manager using a URL that is sent to HP Service Manager from BSM.
The URL has the following format:
<protocol_type>://<Service_Manager_host_name>:<port>/<directory_path>?
ciname=<<CI_name>>&alertname=<<alert_name>>
&triggertime=<<trigger_time>>&currstatus=<<current_status>>
&prevstatus=<<Previous Severity Description>>&kpiname=<<KPI_name>>
&kpivalue=<<KPI_value>>Specify some of the parameters and optionally modify the defaults of other parameters. The alert-related parameters (CI_name, alert_name, trigger_time, current_status, previous_status, KPI_name, and KPI_value) are provided by the alert.
In HP Service Manager, you can keep track of the system status and handling. You can also validate and monitor the alert.
For details on how to automatically create an incident in HP Service Manager, see "Open Incidents in HP Service Manager Using the Legacy URL – Task."
Submitting Incidents when BSM Alerts are Triggered (Incident Submission) Using the CI Alert Retrieval Service
You can automatically manage (open, update, or close) an incident in HP Service Manager when a CI Status alert is triggered in BSM.
HP Service Manager retrieves alert information, using the CI Alert Retrieval Service.
Incidents Opened in HP Service Manager by CI Status Alerts Using the CI Alert Retrieval Service
You can automatically open an incident in HP Service Manager when a CI Status alert is triggered using the CI Alert Retrieval Service.
How HP Service Manager Retrieves Alert Information
The BSM engine triggers a CI Status alert when the specified conditions occur. The alert is sent to the Alerts feed.
By default, every 5 minutes, HP Service Manager retrieves information about the CI Status alerts triggered in BSM, from the Alerts feed, using the CI Alert Retrieval Service. For details, see CI Alert Retrieval Service API Overview. HP Service Manager uses the information to submit an incident.
You can modify the default retrieval time period in HP Service Manager. For details, see HP Service Manager documentation.
For each alert retrieved from the Alerts feed, and depending upon the configuration of the HP Service Manager, the content of a retrieved alert and the state of existing incidents are handled differently. For details see How HP Service Manager Handles Alerts.
How HP Service Manager Handles Alerts
An incident is identified by its key, which is composed of the CI ID and the KPI name of the CI whose change of status triggered the alert.
An incident previously opened is updated with new alert data when a CI Status with the same identifying information is triggered.
HP Service Manager handles alerts as shown in the following diagram:
All correlations (checking the identity of the incident) are done using the combination of the CI ID and the KPI name.
The default mapping of alert severities between BSM to HP Service Manager is as follows:
Downtime/No Data
The default mapping can be modified in HP Service Manager.
For details about how HP Service Manager handles alerts, see Life-Cycle of an Incident Triggered by a CI Status Alert in HP Service Manager – Scenario.
Life-Cycle of an Incident Triggered by a CI Status Alert in HP Service Manager – Scenario
The scenario is as follows: a CI Status alert is triggered in BSM, and at the scheduled time HP Service Manager retrieves the alert information from BSM and creates an incident. The alert is then updated and closed in BSM. You can view what happens in HP Service Manager as follows:
- An incident is created. The Incident Details tab displays the fact that an alert triggered because the FinanceBS CI status changed to Critical was retrieved by HP Service Manager and as a result a new incident was opened in HP Service Manager where the Urgency is Critical, the Product Type and Problem Type as availability, and the contact person is Nicholas Brown. The log indicates that the incident was opened. Click here to see an example.
- An incident is updated. The Incident Details tab displays the fact that an alert triggered because the FinanceBS CI status changed from Major to Minor, was retrieved by HP Service Manager and as a result the previous incident was updated in HP Service Manager. The Urgency changed to Average. The other parameters stayed the same. The log indicates that the incident was updated. Click here to see an example.
You can view the incident history by clicking on each entry in the log. Click here to see an example.
- An incident is closed. The Incident Details tab displays the fact that an alert triggered because the FinanceBS CI status changed from Warning to OK was retrieved by HP Service Manager and as a result the incident was closed in HP Service Manager. The Urgency is Average. The other parameters stayed the same. The log indicates that the incident was closed. Click here to see an example.
Rule and Field Mapping in HP Service Manager
This section describes the rule and the field mapping used in the integration of HP Service Manager with BSM.
Note: This section is for advanced users.
BSM Alert/HP Service Manager Incident Correlation Rules
In the BSM Alert Feed process workflow, rules are used to search, create, update and close incidents.
The rules are configured in the BSM Alert Integration Configuration page.
For details about the correlation rules, see BSM Alert/HP Service Manager Incident Correlation Rules.
How the Rules Work
When an BSM CI Status alert is retrieved, the HP Service Manager database searches for a keyword (CI ID and the KPI name of the CI whose change of status triggered the alert) that is part of the data retrieved with the alert. The keyword is used to determine if the corresponding incident already exists in the database and thus should be updated or closed or if the incident does not exist and should be created. The search is done as follows:
- The search process uses information from the alert. The Correlation Rule is appended to the search clause. If there is no compatible information, the process searches again using the legacy Correlation Rule.
- If a target incident is not found, the process creates a new incident using the fields in the alert.
- If a target incident is found, the process checks if one of the three rules matches the alert retrieved from BSM (target incident is true).
- If no rule matches, the rule failed and the target incident cannot be updated. The process then checks if the target incident is true to the Close Rule. If it is true, the process closes the action for target incident; if it is not true, the target incident is Dropped.
- If a rule matches, its action is performed. For example, if the incident matches the Update Rule the process updates the existing incident in HP Service Manager with the alert information.
For additional details, see "Integration With Alerts (Incident Submission) Using the CI Alert Retrieval Service - Concepts."
Note: The three rules use the severity value as the condition value, so when the three rules are changed, the severity value should be taken into consideration. The severity values are set in the Value Mapping.
Field Mapping Relationship
A field mapping relationship includes the following components:
- It defines the fields mapping relationship between the internal system and external entity.
- It also defines the default value used if the external field does not exist or if it does not have a value.
- It provides the Callback function for the assignment of default value. Five callback functions are defined in this process. These functions are invoked to assign a value to the field of HP Service Manager. For details about the callback function, see Callback Functions. These functions can be used for field mapping instead of values.
Value Mapping
Example of Mapping category and field mapping:
Example of value mapping:
How to Build a Field Mapping Relationship
Field Mapping represents the relationship between the BSM Alert Field and HP Service Manager Incident.
If you want to add additional mapping or you want to modify existing mapping, create or modify the Field Mapping relationship between a BSM Alert field and the corresponding HP Service Manager Incident field. After the two fields have been mapped, proceed as explained in "Modify BAC Alert Integration Field Mapping."
For details on adding a new mapping or modifying an existing mapping, see "Manually Maintain the BAC Alert Integration Field."
Rules for Building Field Mapping Relationship
When you build the new Field Mapping, the following rules should be followed.
- Rule for the Callback Function in the Internal Field Callback column:
- If this function only has one parameter, the Callback sets the value from BSM only when the current action corresponds to the action specified by the parameter; if this value is empty, set the default value.
- If this function has two parameters, the current action uses the second parameter to set the value of the current field, and the value from BSM or the default value is ignored.
Example: The example is based on the out-of-the-box data. Select System Administration -> Base System Configuration -> BAC Alert Integration Field Mapping and check the record line that includes incident.resolution.code In this scenario, the value User Closure is used as the value for incident.resolution.code.
- Rule for the Severity. If you modify the severity (in the Value Mapping tab), the mapping between HP Service Manager severity and BSM status might affect the processes, so the corresponding rule (Create, Update, and Close rules) might have to be modified. Please refer the content of chapter BAC Alert/SM Incident Correlation Rules in HP Service Manager documentation.
CI Alert Retrieval Service API Overview
The CI Alert Retrieval Service can be used to retrieve information from the Alerts feed where CI Status alerts are stored after they are triggered. You access the service using URLs. The alert information is displayed in HTML, XML, or JSON format.
For details on how to open an incident in HP Service Manager, see "Open Incidents Using the CI Alert Retrieval Service – Task."
CI Alert Retrieval Service - Invocation
The URL used to invoke the CI Alert Retrieval Service, which retrieves alerts from BSM, has the following structure:
http://<host>/topaz/services/<security>/customers/1/alerts/ci?alt=<alt>&mode=<mode>&ci-id=<ci-id>&extended-info=<extended-info>
&target-type=<target-type>&from-time=<from-time>
&to-time=<to-time>&severity=<severity>
Note: In the invocation URL, 1 is the customer ID (BSM supports more than one customer; the customer with ID=1 is the default client in a regular installation).
Parameters Passed to the Invocation URL
The following parameters are passed to the URL when invoking the CI Alert Retrieval Service:
- serial. Use this mode when you want the recipient to receive the alerts triggered from the time indicated by the Updated field in the last Service Invocation results. The recipient receives the alerts one by one and does not receive alerts from overlapping time periods, after invoking the service. When you use serial, you do not have to enter a value for the to-time parameter.
- regular. Default. Use this mode when you want the recipient to receive all the alerts triggered between the from-time and to-time period.
Service Manager Adapter
The Service Manager Adapter supports the retrieval of data from HP Service Manager. This adapter connects to, and receives data from, Service Manager using the Web Service API. Every request to Service Manager to calculate a federated query is made through this adapter. For details on how to perform this task, see "Configure the Service Manager/Business Service Management Federated Integration – TaskKPI and PI."
For details about the adapter, click The HP Service Manager Adapter or see "The HP ServiceCenter/Service Manager Adapter" in Modeling Guide.
Integration of HP Service Manager Data with BSM Components - Scenario
This section provides a scenario for the complete integration of HP Service Manager with Alerts, Service Health, and Universal CMDB.
Scenario Details
This sections provides the scenario details:
- The CRM application owner asks the BSM administrator to configure two alerts for the CI representing her application, as follows:
- The first alert is configured to trigger when the status of the Performance KPI attached to the CI worsens.
- The second alert is configured to trigger when the status of the Performance KPI changes to OK and remains OK for more than 20 minutes.
- The CRM application owner is the alert recipient.
Both alerts are configured to open incidents in HP Service Manager when they are triggered.
- Some time after the alerts are put in production, the status of the CI's KPI changes to Warning and the first alert is triggered.
- When HP Service Manager invokes the CI Alert Retrieval Service (in the next cycle), an incident is created for the application CI with a low urgency.
- A few minutes later, the status of the Performance KPI attached to the CI changes to Critical. The CRM application owner received a notification that the first alert was triggered.
- When HP Service Manager invokes the Alert Retrieval Service (in the next cycle), the incident severity is updated to Critical and all of the alert details are appended to the incident.
- The Tier 1 support looks at the opened incidents in HP Service Manager, and detects that a new incident was submitted. When he reviews the incident details, he understands that the CRM business service has a critical performance issue that was triggered recently. He also notices that the incident was automatically submitted by BSM.
- The Tier 1 support takes ownership of the incident and decides to triage it. Using HP Service Manager, he launches the Problem Isolation application directly in the context of the CRM application. The isolation of the problem starts at the relevant CI as the CI ID is part of the data sent by BSM to HP Service Manager when the alert was triggered and is associated with the incident.
- Using the isolation process, the Tier 1 support finds that the problem resides in the Database. He decides to send the incident to the DBAs. The Tier 1 support generates a Snapshot report with all the isolation details and attaches it to the incident, so the DBAs have all the required information for further analysis.
- The DBAs solve the issue.
- The status of the Performance KPI attached to the CI representing the CRM application changes to OK and a follow-up alert is triggered. The CRM application owner receives a notification.
- The triggered alert opens an incident in HP Service Manager with the same identity but with the OK status. The incident is updated with the new data, which overrides the existing data, and its status changes to Close.
- The CRM application owner views the CRM business service health through the BSM Service Health. She can view, in real time, the status of the availability and performance of the CRM application as well as the number of open incidents.
- As she reviews the status of the CRM application, she notices that the number of open incidents is increasing. Using Service Health, she can review the incident's details to better understand the situation and take appropriate action.
Configure the Integration
This section lists the tasks related to the integration conditions you selected earlier. Perform each task in sequence.
In this section, steps with a blue background are performed in BSM, SiteScope, or HP Universal CMDB.
In this section, steps with a pink background are performed in HP ServiceCenter/HP Service Manager.
How to View HP Service Manager Data in Service Health and Service Level Management
You can collect data from an existing HP Service Manager Server and view the data in Service Health and Service Level Management applications.
Note: Complete each step before beginning the next step.
Prerequisites
The HP Service Manager server, Web tier, and Windows client components must be installed. For details, see HP Service Manager Installation guide.
Optional. If you want HP Service Manager to use the SSL-based Trusted Sign-on protocol, configure it according to the instructions in the HP Service Manager online help.
Optional. If you want HP Service Manager to use the LW-SSO, configure it according to the instructions in the HP Service Manager online help. BSM must also be configured with LW-SSO.
Note: Plan to put both the HP Service Manager Web tier and the webapp in the same container, so you can use the same certificate for both.
Enable Access to HP Service Manager From Within Service Health
Disable the query security of the HP Service Manager application to enable accessing the application, through the right-click HP Service Manager menu option in Service Health. You still have the necessary capabilities to properly secure your system without the query hash.
To enable accessing HP Service Manager from within Service Health:
- After installing and configuring LW-SSO, edit the web.xml file. The location of the file depends on the type of Web application server the Web tier is deployed on. It is usually located in the HP Service Manager home directory under the Apache home directory. The web.xml file can be located at:
\Apache Software Foundation\Tomcat 5.5\webapps\sm7\
WEB-INF- In the file, locate the <!-- Specify the Service Manager server host and port location --> section.
- Verify that the following strings exists in the section:
<init-param>
<param-name>querysecurity</param-name>
<param-value>false</param-value>
</init-param>- Restart the Tomcat container using the Net stop tomcat and Net start tomcat commands.
Initialize the Sample Event in HP Service Manager
Open the HP Service Manager application and perform the following steps:
- From the System Navigator, select Menu Navigation > Tailoring > Database Manager.
- In the Form box, enter apm.global.list.entry.
- Select the Administrative Mode option.
- Click Search to open a blank record (from the globallists file).
- Click Search to display a list of lists.
- Select Mass Update available under the List button in the upper right corner of the page. A blank update screen opens. This form is identical in appearance to the lister record, but contains different option buttons.
- Click Expiration, and set the date in the Expiration box to any date in the past, for example, 01/01/90 and click Next.
- Click the Simple Update button to reset the expiration date of all the lists in the globallists file.
- Click End to return to the home menu.
- In the command line, enter *aapm.server.initer and click ENTER.
- Log out of HP Service Manager and log in again.
All the lists in the system are automatically regenerated and HP Service Manager automatically processes all the current records.Define HP Service Manager Tables for External Access to the Clocks
To enable the integration, load the appropriate .unl to provide external access to the clocks table in HP Service Manager. This step enables the display of the Number of Incidents KPI in Service Health. This can be done as follows (note that the probsummary table is accessed by default without .unl):
- In HP Service Manager, manually within HP Service Manager if the tables are used for other external internal integrations. For details, refer to the HP Service Manager documentation.
- Using the configuration file supplied with HP Business Service Management to enable external access to the clocks table:
- Locate the Clocks_extaccess_sm702_10Nov08.unl available in the Setup\SM_Unloads\SM7.1 directory configuration file on the BSM DVD and copy it to a local directory.
- Open the HP Service Manager client and connect to the server.
- Select Toolkit > Database Manager.
- In the menu on the upper right side of the Database Manager, select Import/Load.
- Select the configuration file you copied to the local directory in the first step.
- Click the Load FG button in the left top corner of the page.
- Verify that the clocks table has the values described below. If the values do not match, edit the clocks table in HP Service Manager so that the values are the same as in the below table (for details on how to do that, see HP Service Manager documentation).
Correct the Clocks WSDL
Correct the clocks WSDL to enable the display of the Number of Incidents KPI in Service Health.
- In the HP Service Manager client, select Menu Navigation > Tailoring > Web Services > WSDL Configuration, enter Clocks in the Service Name field, and click Search.
- Click the Field tab.
Note: The values in the table have no meaning
- Click Save and OK.
- Click Search again, select the Fields tab and clear the new entry.
- Click Save and OK.
Correct the Clocks WSDL
Correct the clocks WSDL to enable the display of the Number of Incidents KPI in Service Health.
- In the HP Service Manager client, select Menu Navigation > Tailoring > WSDL Configuration, enter Clocks in the Service Name field, and click Search.
- Click the Field tab.
Note: The values in the table have no meaning
- Click Save and OK.
- Click Search again, select the Fields tab and clear the new entry.
- Click Save and OK.
Add the Type Field to the logical.name Link Line
This step enables EMS to count incidents that were manually opened in HP Service Manager and to display of the Number of Incidents KPI in Service Health.
Note:
For new HP Service Manager 7.10 customers, EMS calculates ONLY incidents that were manually opened after the tailoring process was applied. For existing customers, the previous HP Service Manager version is populating these fields and the integration works even after you upgrade to HP Service Manager to 7.10. Skip this step if you use other versions. Incidents opened by incident submission are always calculated. Perform this step before you configure the SiteScope HP Service Manager Monitor accessed in BSM by clicking Admin > Integrations > EMS Integration Admin. Only incidents that were opened after this step are displayed in BSM Service Health. You add the Type field to the logical.name link line in the probsummary link record as follows:
- In HP Service Manager, login with a System Administrator user (for example, falcon).
- Select Menu Navigation > Tailoring > Tailoring Tools > Links.
- Enter probsummary in the Name field and click Search.
- Set the cursor on the first line that includes logical.name in the Source Field Name field (line 14).
- Select Select Line in the Options menu.
- Add type below company in both the Source field To/Post From columns and in the Target field From/Post To columns.
- Click Save, Back, and then OK.
Create a Corresponding HP Service Manager User
This step enables the display of the Number of Incidents KPI in Service Health.
- Create a dedicated user in HP Service Manager. The user should be used solely for the purposes of the HP Business Service Management/SiteScope integration.
- Make sure that the HP Service Manager machine and the SiteScope machine share the same time zone.
- Make sure that the HP Service Manager machine and the SiteScope machine use the same date format (SiteScope date format): dd/mm/yy.
- When configuring the monitor, use the value for the Username and Password fields that you created in HP Service Manager.
Configure the HP Service Manager Monitor in SiteScope
Configure the HP Service Manager monitor in SiteScope as follows:
- Synchronize HP Service Manager and SiteScope so their time zones are the same. Match their System Time in the Windows or Unix operating system.
- Make sure that the user you are using in SiteScope is the user you defined in Create a Corresponding HP Service Manager User.
- Make sure you have installed the SiteScope EMS license.
- Configure the HP Service Manager monitors in SiteScope. For details, click HP Service Manager Integration - Workflow (for BAC 8.0x or 7.52) or see "How to Work with the HP Service Manager Integration" in Using System Availability Management for other versions of BAC.
Note: In the HP Service Manager monitor the HP Service Manager web service endpoint should be: http://<SM machine>:13080/sc62server/PWS/.
Configure the HP Service Manager Monitor in SiteScope
Configure the HP Service Manager monitor in SiteScope as follows:
- Synchronize HP Service Manager and SiteScope so their time zones are the same. Match their System Time in the Windows or Unix operating system.
- Make sure that the user you are using in SiteScope is the user you defined in Create a Corresponding HP Service Manager User.
- Make sure you have installed the SiteScope EMS license.
- Configure the HP Service Manager monitors in SiteScope. For details, click HP Service Manager Integration - Workflow (for BAC 8.02 or 7.52) or see "How to Work with the HP Service Manager Integration" in Using System Availability Management for other versions of BAC.
Note: You must edit the incidentAttributesMapping.conf file. Locate target_name=configurationItem and change to target_name=affectedItem before you rebuild the jar file.
Note: In the HP Service Manager monitor the HP Service Manager web service endpoint should be: http://<SM machine>:13080/sc62server/PWS/.
Specify the HP Service Manager Web Tier URL in the Infrastructure Settings
The HP Service Manager URL is used when drilling down from BSM to HP Service Manager using the HP SC Menu context menu item.
To specify the HP Service Manager URL, in BSM, select Admin > Platform > Setup and Maintenance > Infrastructure Settings, select Foundations, select Integrations with other applications, and, in the Integrations with other applications - HP Service Manager - Ticketing Integration table, enter the appropriate URL in the ServiceCenter/Service Manager web tier URL entry, using the following format: <protocol>://<host_name>:<port>/<web_app_name>/ where host_name is the name of the HP Service Manager server, port is the port number of the HP Service Manager server, and web_app_name is the name of the application.
The URL of HP Service Manager is for example, http://fando:8080/sm7/.
Specify the HP Service Manager Web Tier URL in the Infrastructure Settings
The HP Service Manager URL is used when drilling down from BSM to HP Service Manager using the HP SC Menu context menu item.
To specify the HP Service Manager URL, in BSM, select Admin > Platform > Setup and Maintenance > Infrastructure Settings, select Foundations, select Integrations with other applications, and, in the Integrations with other applications - HP ServiceCenter - Ticketing Integration table, enter the appropriate URL in the ServiceCenter/Service Manager web tier URL entry, using the following format: <protocol>://<host_name>:<port>/<web_app_name>/ where host_name is the name of the HP Service Manager server, port is the port number of the HP Service Manager server, and web_app_name is the name of the application.
The URL of HP Service Manager is, for example, http://fando:8080/sm7/.
Customize the HP Service Manager EMS Integration Adapter and Check the Assignment – Optional
The HP Service Manager integration adapter is predefined. You can customize the configuration. Make sure that the assignment rule is running (it is running by default).
In BSM, select Admin > Integrations > EMS Integration Admin, select ServiceCenter and click Edit. In the Edit Integration dialog box:
- Configure the HP Service Manager Monitor – Optional. The monitor is used to retrieve data from the EMS system using System Availability Management Administration. The HP Service Manager Monitor is added to a SiteScope monitor group created for this monitor and other Integration Monitor types. It is recommended that you configure Integrations Monitors only after a connection between the SiteScope and HP Business Service Management is established. For details, click HP Service Manager Monitor (for BAC 8.0x) or see "HP Service Manager Monitor" in Using System Availability Management for other versions of BAC.
Note: SiteScope cannot be deployed behind a firewall. SiteScope and the monitored system must be on the same LAN or special firewall configuration might be required.
- Activate the data assignment rule. Make sure that the assignment rule is running.
When the EMS monitor sample includes open incidents in its data source, the Number of Open Incidents KPI (2600), the Number of Open Incidents rule (2600), the HP SC Menu context menu (hpsc), the HP Service Manager context menu item, and the Number of Open Incidents tooltip (2600) are assigned to the EMS Monitor CI.
You can use the EMS Integrations application to customize an HP Service Manager integration. The integration forwards the retrieved data captured from the HP Service Manager system by the SiteScope HP Service Manager monitor to BSM, and creates the appropriate topology that is used to display the data in Service Health. For details on the possible customizations, click Define Assignment Configuration Dialog Box or see "Edit Integration Dialog Box" in Solutions and Integrations.
Specify the State and Severity of Open Incidents to Be Displayed – Optional
To modify the state and severity of the open incidents to be displayed, you can edit the parameters of the Number of Open Incidents rule parameters:
- For the Number of Open Incidents KPIs attached to a specific EMS Monitor CI. In BSM, select Admin > Service Health > Assignments > KPI Assignments, select the ServiceCenter view and the EMS Monitor CI, edit the Number of Open Incidents rule, and edit the Initial State, Final State, and Severity parameters.
- Globally, for all KPIs defined with the Number of Open Incidents rule. In BSM, select Admin > Service Health > Repositories > Business Rules, clone or override the Number of Open Incidents rule, and edit the Initial State, Final State, and Severity parameters.
For details on the parameters, click List of Service Health Business Rules or see "List of Calculation Rules in Service Health" in Using Service Health.
Note: The values available for the Initial State, Final State, and Severity parameters reflect the values defined in HP Service Manager. BSM severity is correlated with HP Service Manager urgency.
Include HP Service Manager CIs in Service Level Management Agreements
You can include HP Service Manager EMS Monitor CIs in your agreements in Service Level Management. Service Level Management contains KPIs and rules specifically configured for HP Service Manager EMS Monitor CIs. The MTTR, MTBF, and MTBSI KPIs and the MTTR, MTBF, and MTBSI rules are dedicated for this integration.
You also configure the incident initial and final state in those rules. For details, click Service Level Management KPIs for System Incidents (for BAC 8.0x) or see "Service Level Management KPIs for System Incidents" in Using Service Level Management for other versions of BAC, and locate "Incident State and Severity Values".
For details on the integration, click Integration with HP Service Manager - Overview (for BAC 8.0x) or see "Integration with HP Service Manager - Overview" in Using Service Level Management for other versions of BAC.
Results
After the task is performed, HP Service Manager data is integrated into BSM. You can:
- View HP Service Manager Data in Service Health and Service Level Management:
SiteScope automatically creates the appropriate topology when HP Service Manager data is integrated into BSM. HP Business Service Management adds the data to the Business Services, ServiceCenter, and Service Measurements views, and you can display these views in Service Health. The Business Service and EMS Monitor CIs are added to Service Level Management.
- Drill down to HP Service Manager from Service Health views:
In Service Health, in the ServiceCenter, and Service Measurements views, use the HP Service Manager option available for EMS Monitor CIs under Business Service CIs, to access the relevant incident in the HP Service Manager application. For information about the HP Service Manager application, consult the HP ServiceCenter documentation.
How to View the Planned Changes and Incidents Tab in the 360° View page in Service Health
This section includes the task needed to display the Planned Changes and Incidents tab in the 360° View page in Service Health.
Federate BSM and HP Service Manager Data
This step is performed for the integration of Service Health with HP Service Manager and the integration of Problem Isolation with HP Service Manager. Do not perform this step for the integration of HP Service Manager with Service Health if you already performed it for the integration of HP Service Manager with Problem Isolation. This step enables the display of incidents and changes in the 360° View page. For details, click Changes and Incident Tab (for BAC 8.0x) or see "Changes and Incidents Tab" in Using Service Health for other versions of BAC.
You configure the HP ServiceCenter/HP Service Manager Adapter to federate Universal CMDB data with HP Service Manager CMDB data. For details on this topic, see "Configure the Service Manager/Business Service Management Federated Integration – TaskKPI and PI."
Results
After the task is performed, HP Service Manager data is integrated into BSM, you can view the planned changes and incident details in the Changes & Incidents tab in the 360° View page in Service Health.
Before you Upgrade HP Service Manager From Previous Versions
It is recommended to back up the following files before performing the upgrade procedure to HP Service Manager 7.02. For details on the upgrade see HP Service Manager documentation.
ServiceCenter Server
ServiceCenter Webtier
How to Configure BSM Alerts to Forward an Event When the Alert is Triggered
To automatically forward an event when an alert is triggered, follow the steps described in this section.
For concept details, see Generating Incidents in HP Service Manager when BSM Alert is Triggered - Overview.
Enable a CI Status Alert to be Sent as an Event to the Event Channel
By default, a CI Status alert is mapped to an event using a default Event Template. You can modify the default Event Template or select a different Event Template as follows:
- Select Admin > Service Health > View Management > CI Status Alerts, select a view and a CI and click New Alert or select an existing alert and click Edit.
- In the Actions page, click the New Event Generation link in the Generate Events section.
- In the CI Alert Template Repository dialog box that opens, select the template you want to use to map the alert to an event and click Select. The template you selected is now listed in the Generate Events section. For user interface details, see "CI Status Template Repository Dialog Box" in Using Service Health.
Enable an SLA Alert to be Sent as an Event to the Event Channel
By default, an SLA alert is mapped to an event using a default Event Template. You can modify the default Event Template or select a different Event Template as follows:
- Select Admin > Service Level Management > SLA Alerts, click New Alert or select an existing alert and click Edit.
- In the Actions page, click the New Event Generation link in the Generate Events section.
- In the SLA Template Repository dialog box that opens, select the template you want to use to map the alert to an event and click Select. The template you selected is now listed in the Generate Events section. For details, see "Event Template for SLA Alerts" in Using Service Level Management.
Enable an EUM Alert to be Sent as an Event to the Event Channel
By default, an EUM alert is mapped to an event using a default Event Template. You can modify the default Event Template or select a different Event Template as follows:
- Select Admin > End User Management > Monitoring, select the view and the CI in the left pane, click the Alerts tab, and click the Press to create new alert
button, or select one of the alerts, and click the Press to edit alert
button.
- In the Actions page, select the Generate Event option. For user interface details, see "Actions Tab" in Using End User Management.
- In the Definition Details area, in the Actions section, click the first link in the Generate events with <template name> template and <value> values Event Type Indicator, to select or modify the default template that maps the alert to the event in the Template Repository dialog box. For user interface details, see "Template Repository Dialog Box" in Using End User Management.
- Click the second link to open the Event Type Indicator dialog box, where you specify the ETI that corresponds to the alert. For user interface details, see "Event Type Indicator Dialog Box" in Using End User Management.
How to Open Incidents Using the CI Alert Retrieval Service
You can automatically manage (open, update, or close) an incident in HP Service Manager when a CI Status alert is triggered in BSM.
HP Service Manager retrieves the information about the alert from BSM using the CI Alert Retrieval Service. For details, see Incidents Opened in HP Service Manager by CI Status Alerts Using the CI Alert Retrieval Service.
For details on the mechanism used to open an incident in HP Service Manager when a CI Status alert is triggered, see CI Alert Retrieval Service API Overview.
Download the HPSM_00037 Patch
To retrieve the patch:
Import the Core Unload File
The core unload file includes the basic logic of the integration with BSM integration.
Import the core unload file as follows:
- In HP Service Manager, click Menu Navigation > Tailoring > Database Manager.
- Left-click the detail button
and select Import/Load.- In the HP Service Manager File Load/Import, click Specify File to locate the appropriate file:
<zip file>\unloads\SM7.0\smbac_core_sm7.02.unl- In the Import Descriptor box, enter the description.
- In the File Type list, select winnt.
- Select a display option.
- Click Load FG to start loading.
Import the Core Unload File
The core unload file includes the basic logic of the integration with BSM integration.
Import the core unload file as follows:
- In HP Service Manager, click Menu Navigation > Tailoring > Database Manager.
- Left-click the detail button
and select Import/Load.- In the HP Service Manager File Load/Import, click Specify File to locate the appropriate file:
<zip file>\unloads\SM7.1\smbac_core_sm7.10.unl- In the Import Descriptor box, enter the description.
- In the File Type list, select winnt.
- Select a display option.
- Click Load FG to start loading.
Add the bac.ci.id Field to the probsummary Table
Add one field to the probsummary table in the HP Service Manager client:
- In HP Service Manager, click System Definition > Tables > probsummary > Fields.
- Double-click the New Field button to add a new field.
- In the Field Name box, enter bac.ci.id and click OK.
- In the General Properties area, in the Data Type list, select Character.
- Click the Save button to save the new field.
Perform the Automatic Default Configuration
This step describes how to import the smbac_out-of-boxXXX.unl file (where XXX represents different versions) to create the default configuration.
Note: You can also perform the equivalent procedure manually. For details, see "Manually Install Out-of-Box Unload."
- In HP Service Manager, click Menu Navigation > Tailoring > Database Manager.
- Left-click the detail button
and select Import/Load.- In the HP Service Manager File Load/Import page, click Specify File to locate the appropriate file. The file is loaded via the file browser. It is located at:
<zip file>\unloads\SM7.0\smbac_out-of-box_sm7.02.unl- Enter the description in the Import Descriptor box.
- Select winnt in the File Type list.
- Select a display option.
- Click Load FG to start loading.
After the deployment, the following components are affected as follows:
Perform the Automatic Default Configuration
This step describes how to import the smbac_out-of-boxXXX.unl file (where XXX represents different versions) to create the default configuration.
Note: You can also perform the equivalent procedure manually. For details, see "Manually Install Out-of-Box Unload."
- In HP Service Manager, click Menu Navigation > Tailoring > Database Manager.
- Left-click the detail button
and select Import/Load.- In the HP Service Manager File Load/Import page, click Specify File to locate the appropriate file. The file is loaded via the file browser. It is located at:
<zip file>\unloads\SM7.1\smbac_out-of-box_sm7.10.unl- Enter the description in the Import Descriptor box.
- Select winnt in the File Type list.
- Select a display option.
- Click Load FG to start loading.
After the deployment, the following components are affected as follows:
Verify the Deployment
To verify that the deployment completed correctly, in HP Service Manager, use the following methods:
- Go to the Menu form (for details, see "Manually Add a Menu").
- Enter SYSTEM ADMINISTRATION in the Menu Name box to check the Main menu data against Main Menu Folder.
- Go to the Menu form (for details, see "Manually Add a Menu").
- Enter SMBAC Alert Integration in the Menu Name box to check the Details menu data against Detail Menu Items.
- Go to BAC Alert Integration Entity form (for details, see "Manually Maintain a BAC Alert Integration Entity").
- Click Search to check the data. (Refer to the Field for details).
- Go to BAC Alert Integration Field form (for details, see "Manually Maintain the BAC Alert Integration Field").
- Click Search to check the data. (Refer to the Entity for details).
- Go to BAC Alert Integration Field Mapping form (for details, see "Manually Maintain the Business Availability Center Alert Integration Field Mapping").
- Click Search to check the data. (Refer to the Entity and Field Mapping for details).
Modify BSM Alert Integration Configuration
After the deployment is complete, you can configure the system to fit the customer's system environment.
HP Service Manager retrieves information about the CI Status alerts from BSM using the CI Alert Retrieval Service. For details, see CI Alert Retrieval Service API Overview.
In HP Service Manager, click Menu Navigation > System Administration > Base System Configuration, click Refresh, and click Base System Configuration > BAC Alert Integration > BAC Alert Integration Configuration. Proceed as follows:
http://<host name>/topaz/services/technical/customers/1/alerts/ci.
For details about the URL, see CI Alert Retrieval Service API Overview.
- Enter updated.time in the Name field.
- Click Search to display the target configuration.
- Modify the value of this configuration; this time represents the time when HP Service Manager receives the BSM alert. Make sure you use the same format as in the original value. For example: 2009-05-24T11:09:22+0300
Modify BAC Alert Integration Field Mapping
Display the currently-used Mapping ID (default: SMBACMapping) on the Configuration page and enter BAC-SM Mapping ID in the Description field.
- In HP Service Manager, click Menu Navigation > System Administration > Base System Configuration > BAC Alert Integration > BAC Alert Integration Field Mapping.
- Enter SMBACMapping in the Id box on the Field Mapping page, and click Search.
- Locate the cells under the Default Internal Field Value column. They should look like the table below (The default values must be populated, but the values may be different for different version of HP Service Manager.)
- Follow the Comments in the table to Insert/Modify the value. (When the field of a HP Service Manager incident is not matched, the callback function does not return a value, the default listed in the Default Internal Field Value column is used.)
Note: The Default Internal Field Value is case-sensitive.
Example
This is an example for HP Service Manager 7.02.
Modify BAC Alert Integration Field Mapping
Display the currently-used Mapping ID (default: SMBACMapping) on the Configuration page and enter BAC-SM Mapping ID in the Description field.
- In HP Service Manager, click Menu Navigation > System Administration > Base System Configuration > BAC Alert Integration > BAC Alert Integration Field Mapping.
- Enter SMBACMapping in the Id box on the Field Mapping page, and click Search.
- Locate the cells under the Default Internal Field Value column. They should look like the table below (The default values must be populated, but the values may be different for different version of HP Service Manager.)
- Follow the Comments in the table to Insert/Modify the value. (When the field of a HP Service Manager incident is not matched, the callback function does not return a value, the default listed in the Default Internal Field Value column is used.)
Note: The Default Internal Field Value is case-sensitive.
Set Up the SMBAC Scheduler Auto Start
To make sure the SMBAC scheduler auto-starts/restarts after HP Service Manager stars/restarts, add the processor information as follows:
- In HP Service Manager, type the info command in the Service Manager command line, and click ENTER. You can now enter startup in the Type box.
- Click Search in the Processor Information area, scroll down and add a new entry according to the following table. Click Add to save the changes.
The Processor Information user interface is as follows:
Modify the Language Used to Display the Service Invocation Results
The language you selected for the browser is used to display the Service Invocation results. It causes the CI Alert Retrieval service to retrieve the description and condition description of the alert for this language, from BSM. If you are not using a browser to display the Service Invocation results, you specify the requested language in the header of the HTTP request.
You set the supported language in the BAC Alert Integration Configuration form, go to HP Service Manager, select Menu Navigation > Utilities > Administration > BAC Alert Integration Configuration, and modify the value of the Accept-Language configuration. The default value is en.
For details about the languages supported by BSM, click Working in Non-English Locales (for BAC 8.0x) or see "Working in Non-English Locales" in Reference Information for other versions of BAC.
Modify the Language Used to Display the Service Invocation Results
The language you selected for the browser is used to display the Service Invocation results. It causes the CI Alert Retrieval service to retrieve the description and condition description of the alert for this language, from BSM. If you are not using a browser to display the Service Invocation results, you specify the requested language in the header of the HTTP request.
You set the supported language in the BAC Alert Integration Configuration form, go to HP Service Manager, select System Administration> Base System Configuration > BAC Alert Integration Configuration, and modify the value of the Accept-Language configuration. The default value is en.
For details about the languages supported by BSM, click Working in Non-English Locales (for BAC 8.0x) or see "Working in Non-English Locales" in Reference Information for other versions of BAC.
Start the SMBAC Scheduler
To start the alert retrieval scheduler in Service Manager follow these steps -
Configure the Security at the HP Service Manager Site – Optional
Note: Perform this step if you have not already done so in other configurations of HP Service Manager/BSM integration components.
To ensure the communication security between the CI Alert Retrieval Service (HP Service Manager site) and BSM CI Alert Retrieval Service Web server (BSM site), the system supports using HTTP over SSL or HTTPS.
The CI Alert Retrieval Service Web server URL is contained in the Configuration component.
For additional details, see Examples of Security Configuration.
To support HTTPS communication at the HP Service Manager site:
- In HP Service Manager, generate a public/private key pair with the following keytool, using the following command:
keytool -genkey -keystore sm_keystore.jks -alias smYou are prompted to type in the password and private key for the keystore, and your last name and first name. Type in the FQDN (full qualified domain name) of your server when you are prompted for your last name and first name.
- Generate the certificate signing request, using the following command:
keytool -certreq -keystore sm_keystore.jks -alias sm -file sm.csr- Sign using the Certificate Authority (CA):
- Import the CA root certificate to the keystore, using the following command:
keytool -import -file ca.cer -trustcacerts -keystore sm_keystore.jks -alias ca- Import the certificate reply back to key store, using the following command:
keytool -import -file sm.cer -trustcacerts -keystore sm_keystore.jks -alias smThe alias name used in this command must be the same as the alias name used in the first step so that the signed certificate reply can be paired with the original private key correctly.
- Create a directory to hold your key store (for example, %SM_SERVER%/RUN/security), and save the sm_keystore.jks file in this directory.
- Enable SM SSL Setting by opening sm.ini in the directory where you install the HP Service Manager server, and set the setting as indicated below. For details, see Parameter Settings in the sm.ini File.
# SSL configuration
ssl:1
ssl_reqClientAuth:1
sslConnector:1
httpsPort:13443
# Certificates
truststoreFile:security/sm_keystore.jks
truststorePass:password
keystoreFile:security/sm_keystore.jks
keystorePass:password
- Restart the HP Service Manager server service. In the HP Service Manager server machine, select Start > Settings > Control Panel > Administrative tools > Services, and restart HP Service Manager 7.XX Server.
Configure the Security at the HP Service Manager Client – Optional
Note: Perform this step if you have not already done so in other configurations of HP Service Manager/BSM integration components.
Perform this step to ensure that the client can connect to the HP Service Manager site when the HP Service Manager site opens the SSL.
To support HTTPS communication at the HP Service Manager client:
- Generate a public/private key pair with the following keytool, using the following command: keytool -genkey -alias smclient -keystore smclient_keystore.jks
- Generate the certificate signing request, using the following command: keytool -certreq -alias smclient -keystore smclient_keystore.jks -file smclientcert_req.crs
- Sign using the Certificate Authority (CA):
- Import the CA root certificate to the keystore, using the following command: keytool -import -trustcacerts -alias smca -keystore smclient_keystore.jks -file ca.cer
- Import the certificate reply back to key store, using the following command: keytool -import -trustcacerts -alias smclient -keystore smclient_keystore.jks -file smclientcert.cer
- Import the CA root certificate to trust key store, using the following (key store cacerts is in <windows path >\HP\Service Manager 7.02\Client\plugins\com.hp.ov.sm.client.common_7.02, it is better direct to this folder to run the following command) command: keytool -import -keystore cacerts -trustcacerts -alias smca -file ca.cer
You also configure the SSL in the HP Service Manager client:
- Open the Service Manager Client.
- From the menu select Window > Preferences... to open the Preferences dialog box.
- Expand the HP Service Manager node in the left menu tree. Select Security to open the client security dialog.
- Click Browse...
- Specify the CA certificates file (cacerts) and Client keystore file (smclient_keystore.jks).
- Input the password of the client keystore in the Client keystore password field. Click OK.
- Restart Service Manager Client to enable the newly configured Security information.
- In the Connections dialog box, the value of the Server host name field must be the fully qualified name of the Service Manager server.
- In the Advanced tab, make sure that the Use SSL Encryption option is selected.
Important:
- If you have already set up HP Service Manager SSL with a certificate signed using the CA trusted by BSM, you do not need to make changes.
- If you have already set up HP Service Manager SSL with a certificate signed by a CA not trusted by BSM, you have two choices: to import the CA root certificate to BSM or to perform the steps above to create a new key pair and sign it with the CA root certificate which BSM trusts.
- HP Service Manager supports only the JKS format (PKCS12 format is not supported).
- The keystore password and the private key password must be the same.
- The Certificate has an expiry date; make sure you update your certificate periodically.
- Your key store and trust certificate store can be one JKS format store.
- Specify the FQDN instead of IP address anytime you use HTTPS/SSL.
Examples of Security Configuration
- Generate public/private key pair with keytool:
D:\Program Files\HP\Service Manager 7.02\Server\RUN>keytool -genkey -keystore sm
_keystore.jks -alias sm
Enter keystore password: vinson
Re-enter new password: vinson
What is your first and last name?
[Unknown]: vinson
What is the name of your organizational unit?
[Unknown]: hp
What is the name of your organization?
[Unknown]: hp
What is the name of your City or Locality?
[Unknown]: shanghai
What is the name of your State or Province?
[Unknown]: shanghai
What is the two-letter country code for this unit?
[Unknown]: cn
Is CN=vinson, OU=hp, O=hp, L=shanghai, ST=shanghai, C=cn?
[no]: y
Enter key password for <sm>
(RETURN if same as keystore password):vinson
- Generate the certificate signing request:
D:\Program Files\HP\Service Manager 7.02\Server\RUN>keytool -certreq -keystore s
m_keystore.jks -alias sm -file sm.csr
Enter keystore password: vinson
- Sign it with the CA:
D:\Program Files\HP\Service Manager 7.02\Server\RUN>openssl x509 -req -days 365
-in sm.csr -out sm.cer -CA ca.cer -CAkey cakey.pem –Cacreateserial
Loading 'screen' into random state - done
Signature ok
subject=/C=cn/ST=shanghai/L=shanghai/O=hp/OU=hp/CN=vinson
Getting CA Private Key
Enter pass phrase for cakey.pem:
- Import the CA root certificate to keystore:
D:\Program Files\HP\Service Manager 7.02\Server\RUN>keytool -import -file ca.cer
-trustcacerts -keystore sm_keystore.jks -alias ca
Enter keystore password: vinson
Owner: EMAILADDRESS=mail@mail.com, CN=vinson, OU=hp, O=hp, L=hp, ST=shanghai, C=cn
Issuer: EMAILADDRESS=mail@mail.com, CN=vinson, OU=hp, O=hp, L=hp, ST=shanghai,C=cn
Serial number: e611ad0fd5bc9e10
Valid from: Fri Oct 10 11:12:39 CST 2008 until Fri Jul 08 11:12:39 CST 2011
Certificate fingerprint:
MD5: B5:D8:9F:A4:8B:24:70:79:DD:4D:0D:5A:44:12:F1:37
SHA1: 7B:55:63:95:C7:14:F9:3B:C8:57:B6:81:24:A0:4F:00:78:CD:D1:94
Trust this certificate [no]: y
Certificate was added to keystore
- Import the "certificate reply" back to keystore:
D:\Program Files\HP\Service Manager 7.02\Server\RUN>keytool -import -file sm.cer -trustcacerts -keystore sm_keystore.jks -alias sm
Enter keystore password: Vinson
Certificate reply was installed in keystore
- Sign the Certificate by the Self-signed CA (optional):
This step generates the signed certification sm.cer.
- Generate the key pairs (private/public key):
D:\Program Files\HP\Service Manager 7.02\Server\RUN>openssl genrsa -des3 -out cakey.pem 2048
Loading 'screen' into random state - done
Generating RSA private key, 2048 bit long modulus ...............+++.............+++e is 65537 (0x10001)
Enter pass phrase for cakey.pem: Vinson
Verifying - Enter pass phrase for cakey.pem: vinson
- Generate the self-signed CA:
D:\Program Files\HP\Service Manager 7.02\Server\RUN>openssl req -config openssl.conf -new -x509 -days 1001 -key cakey.pem -out ca.cer
Enter pass phrase for cakey.pem:
You are about to be asked to enter information that will be incorporated into your certificate request.
What you are about to enter is what is called a Distinguished Name or a DN.
There are quite a few fields but you can leave some blank
For some fields there will be a default value,
If you enter '.', the field will be left blank.
-----
Country Name (2 letter code) [AU]:cn
State or Province Name (full name) [Some-State]: shanghai
Locality Name (e.g. city) []: shanghai
Organization Name (e.g. company) [Internet Widgits Pty Ltd]: hp
Organizational Unit Name (e.g. section) []: hp
Common Name (e.g. YOUR name) []: vinson
Email Address []:mail@mail.com
- Sign the certificate by the self-signed CA:
D:\Program Files\HP\Service Manager 7.02\Server\RUN>openssl x509 -req -days 365 -in sm.csr -out sm.cer -CA ca.cer -CAkey cakey.pem –Cacreateserial
Loading 'screen' into random state – done
Signature ok
subject=/C=cn/ST=shanghai/L=shanghai/O=hp/OU=hp/CN=Vinson
Getting CA Private Key
Enter pass phrase for cakey.pem: vinson
Results - View Incidents in HP Service Manager
To view incidents in HP Service Manager:
- Define CI status alerts. For details, click Create a CI Status Alert Scheme and Attach it to a CI (for BAC 8.0x) or see "Create a CI Status Alert Scheme and Attach it to a CI" in Alerts for other versions of BAC.
- Select the Open incident in Service Manager option in the Actions page in the CI Status Alerts wizard. For details, click Actions Page (for BAC 8.0x) or see "Actions Page" in Alerts for other versions of BAC.
You can now view, in HP Service Manager, the incidents related to the CI Status alerts in BSM. For details, see HP Service Manager documentation.
Upgrade from the Previous Version of HP Service Manager Integration with Alerts
If you have installed the previous version of the integration of HP Service Manager with Alerts, perform the following step to upgrade to the new version.
Uninstall the legacy HP ServiceCenter/HP Service Manager Integration
To uninstall the legacy HP ServiceCenter/HP Service Manager integration, proceed as follows:
Modify the Enable Legacy Integration in BSM Infrastructure Setting
In BSM, select Admin > Platform > Setup and Maintenance > Infrastructure Settings, choose Foundations, select Integrations with other applications, and locate the Enable Legacy Integration in Service Manager entry in the Integrations with other applications - Alerts - Service Manager Integration table. Make sure the value is false.
How to Open Incidents in HP Service Manager Using the Legacy URL
To automatically open an incident in HP Service Manager using the legacy URL, when a CI Status is triggered in BSM, follow the steps described in this section.
For details about the mechanism used to open an incident in HP Service Manager when a CI Status alert is triggered, see "Integration With Alerts (Incident Submission) Using the CI Alert Retrieval Service - Concepts."
Configure HP ServiceCenter/HP Service Manager
For details on configuring HP ServiceCenter/HP Service Manager to integrate with Alerts using the legacy URL, see "Applying the BAC integration to ServiceCenter" chapter in the BAC KPI Monitoring to Incident Management Integration in the HP ServiceCenter/HP Service Manager Documentation Library (available in the smbac-dist-1.00-bin.zip).
Specify the Name of the HP Service Manager Host
To specify the name of the host where HP Service Manager is located (ServiceCenter host name parameter), in BSM, select Admin > Platform > Setup and Maintenance > Infrastructure Settings, choose Foundations, select Integration with other applications, and enter the name of the host in the ServiceCenter host name entry in the Integration with other applications - Service Manager Integrations table.
Specify the Protocol to be Used For the Interface
To specify the protocol to be used for the interface between the Alerts application and the HP Service Manager application, in BSM, select Admin > Platform > Setup and Maintenance > Infrastructure Settings, choose Foundations, select Integration with other applications, and enter the protocol (either http or https) in the Protocol type entry in the Integration with other applications - ServiceCenter Integrations table.
Specify the Hidden Parameters – Optional
You can change the hidden parameters to match the new information, if, for example, HP Service Manager changes the path to their directories or the port dedicated to listening to BSM alerts.
Optionally, you can also add parameters to the URL.
To change the hidden parameters or to add parameters to the URL, contact HP Software Support.
Add the Open ticket in ServiceCenter Option in the CI Status Alert Wizard
To add the Open ticket in ServiceCenter option to the CI Status Alert wizard, in BSM, select Admin > Platform > Setup and Maintenance > Infrastructure Settings, choose Foundations, select Integration with other applications, and locate the Enable alerts to ServiceCenter entry in the Integration with other applications - ServiceCenter - Alert Integration table. Specify true to add the Open ticket in ServiceCenter option to the CI Status Alert wizard or false to remove the option.
Enable the Legacy URL to Open Incidents in HP Service Manager
To enable the legacy URL to open incidents in HP Service Manager, in BSM, select Admin > Platform > Setup and Maintenance > Infrastructure Settings, choose Foundations, select Integration with other applications, and in the Integrations with other applications - Alerts-Service Manager Integration table, locate:
Define CI Status Alerts
In BSM, define CI status alerts. For details, click Create a CI Status Alert Scheme and Attach it to a CI (for BAC 8.0x) or see "Create a CI Status Alert Scheme and Attach it to a CI" in Alerts for other versions of BAC.
Enable the Open ticket in ServiceCenter Option in the CI Status Alert Wizard
While defining the CI Status alerts, in BSM, select the Open ticket in ServiceCenter option in the CI Status Alert wizard to automatically sent CI Status to ServiceCenter when the CI Status alert is triggered.
For details about the option for the CI Status alert, click Actions Page (for BAC 8.0x) or see "Actions Page" in Alerts for other versions of BAC.
Result
When a CI Status alert is triggered in BSM, a corresponding incident is opened in HP Service Manager. For details, see "Integration With Alerts (Incident Submission) Using the CI Alert Retrieval Service - Concepts."
How to Configure the Service Manager/Business Service Management Federated Integration
This task describes how to configure the HP Service Manager - BSM federated integration in order to allow both products to share information and data.
This section describes how to deploy the Service Manager adapter.
Prerequisite
Optional. If you want HP Service Manager to use the SSL-based Trusted Sign-on protocol, configure it according to the instructions in the HP Service Manager online help if you have not already done so.
Optional. If you want HP Service Manager to use the LW-SSO, configure it according to the instructions in the HP Service Manager online help if you have not already done so.
Note: For BSM to configure the federation adapter, an external CMDB must be installed
Load the Integration Tailoring Material
HP Service Manager uses a proprietary binary file format known as unload files to contain packages of scripts, forms, file records, and other materials. By convention, these files have a file type of .unl on Windows platforms.
- In HP Service Manager, copy, to an accessible network location:
The BACExtAccess_70_v1.unl file available in the Setup\SM_Unloads\SM7.0 directory of the Service Pack installation package.
The ucmdbintegration7_0x.unl file available in the Setup\SM_Unloads\SM7.0 directory of the Service Pack installation package.- In the HP Service Manager client, click Start > Programs > HP > Service Manager 7.02, and log in as a user with Administrator privileges, such as falcon (no password).
- Locate the command line text widget in the menu bar at the top of the client display, to the right of the Printer icon.
- In the HP Service Manager client, type db in the Search box and press enter to start the Database Manager application.
- Right-click anywhere on the white background, and select Import / Load from the context menu that displays to start the ServiceCenter File Load/Import application.
- Click the manila folder icon
at the end of the File Name box and navigate to the .unl files you saved previously (as done at the beginning of this step). Select each file, and click Open. The screen shown above refreshes and displays with the path to the selected file.
- Click the Load FG button on the toolbar to load the file.
- Log out of the client.
Load the Integration Tailoring Material
HP Service Manager uses a proprietary binary file format known as unload files to contain packages of scripts, forms, file records, and other materials. By convention, these files have a file type of .unl on Windows platforms.
- In HP Service Manager, copy, to an accessible network location:
The BACExtAccess_71_v1.unl file available in the Setup\SM_Unloads\SM7.1 directory of the Service Pack installation package.
The ucmdbintegration7_1x.unl file available in the Setup\SM_Unloads\SM7.1 directory of the Service Pack installation package.- In the HP Service Manager client, click Start > Programs > HP > Service Manager 7.1, and log in as a user with Administrator privileges, such as falcon (no password).
- Locate the command line text widget in the menu bar at the top of the client display, to the right of the Printer icon.
- In the HP Service Manager client, type db in the Search box and press enter to start the Database Manager application.
- Right-click anywhere on the white background, and select Import / Load from the context menu that displays to start the ServiceCenter File Load/Import application.
- Click the manila folder icon
- Click the Load FG button on the toolbar to load the file.
- Log out of the client.
Configure HP Service Manager
If you are connecting to HP Service Manager, import the SCR41399_SM70.unl unload file:
- In Service Manager, click Menu Navigation > Tailoring > Database Manager.
- Right-click the detail button and select Import/Load.
- In the HP Service Manager File Load/Import, click Specify File and locate the SCR41399_SM70.unl unload file available in the <ServiceCenter_installation_DVD>\AppUnloads\7.02unloads.zip\ directory. The file is loaded via the file browser.
- Enter the description in the Import Description box.
- Select winnt in the File Type list.
- Select a display option.
- Click Load FG to start loading.
- Open the HP Service Manager client.
- Display WSDL Configuration in the Navigator (Main Menu > Menu navigation > Tailoring) and in the Object Name field:
- Enter Problem and press ENTER. Click the Fields tab and ensure that the status attribute appears in the Field list with Status as its caption and the affected.ci(ci.device.name) attribute appears in the Field list with CiDeviceName as its caption. If this attribute does not appear in the Field list, add it and save your changes. Click Cancel.
- Enter Device and press ENTER. Click the Fields tab and ensure that the network.name attribute appears in the Field list with NetworkName as its caption. If this attribute does not appear in the Field list, add it and save your changes. Click Cancel.
- Enter Change and press ENTER. Click the Fields tab and ensure that the header,orig.operator attribute appears in the Field list with OpenedBy as its caption. If this attribute does not appear in the Field list, add it and save your changes. Click Cancel.
Configure the Service Desk Adapter - Validate the xml File
The first step in the Service Desk Adapter configuration is to validate the xml file.
The Adapter configuration file serviceDeskConfiguration.xml is delivered without a default configuration file. It is located in the following directory:
- If the UCMDB is installed on the Processing server (embedded UCMDB), the file is located in:
<BSM Processing server root directory>\fcmdb\CodeBase\ServiceDeskAdapter,- If the UCMDB is installed on a separate server (standalone UCMDB), the file is located in:
<uCMDB home directory>\UCMDB\UCMDBServer\j2f\fcmdb\CodeBase\
ServiceDeskAdapterPrepare the appropriate file as follows:
- In the directory listed above, locate the appropriate serviceDeskConfiguration.xml.<suffix>.
- Delete the suffix of the configuration file name and save the file, so the new name of the file is serviceDeskConfiguration.xml in the same directory. For example, delete .7.0x in the name of the serviceDeskConfiguration.xml.7.0x file.
Configure the Service Desk Adapter - Validate the xml File
The first step in the Service Desk Adapter configuration is to validate the xml file.
The Adapter configuration file serviceDeskConfiguration.xml is delivered without a default configuration file. It is located in the following directory:
- If the UCMDB is installed on the Processing server (embedded UCMDB), the file is located in:
<BSM Processing server root directory>\fcmdb\CodeBase
\ServiceDeskAdapter,- If the UCMDB is installed on a separate server (standalone UCMDB), the file is located in:
<uCMDB home directory>\UCMDB\UCMDBServer\j2f\fcmdb\CodeBase\
ServiceDeskAdapterPrepare the appropriate file as follows:
- In the directory listed above, locate the appropriate serviceDeskConfiguration.xml.<suffix>.
- Delete the suffix of the configuration file name and save the file, so the new name of the file is serviceDeskConfiguration.xml in the same directory. For example, delete .7.1x in the name of the serviceDeskConfiguration.xml.7.1x file.
Configure the Service Desk Adapter - Configure the Time Zone
The second step in the Service Desk Adapter configuration is to configure the time zone so Incidents and Planned Changes have the correct time definition.
- In HP Service Manager, select Navigation pane > Menu navigation > System Administration > Base System Configuration > Miscellaneous > System Information Record.
- Choose the Date Info sub tab.
- Open the serviceDeskConfiguration.xml file; this is the file whose name you modified in the previous step.
- Go to the row that includes the following string:
<globalConnectorConfig><![CDATA[<global_configuration>
<date_pattern>MM/dd/yy HH:mm:ss</date_pattern>
<time_zone>US/Pacific</time_zone> and check the date and time format and the time zone.- Change the date format in the same row in the serviceDeskConfiguration.xml file located at
<UCMDB root directory>\fcmdb\CodeBase\ServiceDeskAdapter, to match the date and time format used in HP Service Manager. Remember to write the month in capital letters.Note: Specify a time zone from the Java time zone list that matches the time zone used in the HP Service Manager server; for example, America/New York.
Configure the Service Desk Adapter - Create a Service Desk Adapter
Note: This step is performed for both the integration of Service Health with HP Service Manager and the integration of Problem Isolation with HP Service Manager. Do not perform these steps for the integration of HP Service Manager with Service Health if you already performed them for the integration of HP Service Manager with Problem Isolation.
The step enables you to create a new service desk adapter.
- In BSM, access the Federated CMDB window: Admin > Universal CMDB > Settings > Federated CMDB.
- To select the appropriate attributes for the CI Type, click the New Data Store button to open the New Data Store dialog box. For details, click New Data Store Wizard (for BAC 8.0x) or see "New Data Store Wizard" in Modeling Guide for other versions of BAC.
- In the Data Stores dialog box, fill in the fields as follows:
- Click Test connection, verify the status of the Connection Test Status, and click OK.
- In the Data Store dialog box, select the following options:
- Click Finish.
Configure the CMDB Changes Adapter
The CMDB Changes adapter is use as a source adapter to query the CMDB for changes.
The adapter is based on TQLs and the CMDB history database. It does not support any property condition beside the root_class IN ... condition on the Root node.
All the CI attributes that should be replicated must have the Change Monitored set (STATIC qualifier) in order to be written to the History database.
Each relation must have the TRACK_LINK_CHANGES qualifier in order to be written to the History database.
The CMDB Changes adapter should be defined as a source adapter in the replication job.
Configure the CMDB Changes adapter. The Replication Job uses this adapter to extract CIs from the UCMDB to HP Service Manager.
- In BSM, access the Federated CMDB window: Admin > Universal CMDB > Settings > Federated CMDB > Data Stores.
- Click the Add button to add a new data store.
- In the Data Stores dialog box, fill in the fields as follows:
- Click Test connection, verify the status of the Connection Test Status, and click OK.
- In the Data Store dialog box, click Next and verify that the following message is displayed: A connection has been successfully created.
- Click Finish.
- In the Message window, click OK.
- In the Data Store Queries Supported by Adapter dialog box, select the following queries:
- Click Next and then Finish.
- In the Message window, click OK.
Configure the RMI Adapter
The RMI adapter is used as a source adapter in the UCMDB-HP Service Manager synchronization for the queries that include compound relations.
Configure the RMI adapter. The Replication Job uses this adapter to provide the relationships between the CIs in HP Service Manager.
- In BSM, access the Federated CMDB window: Admin > Universal CMDB > Settings > Federated CMDB > Data Stores.
- Click the Add button to add a new data store.
- In the Data Stores dialog box, fill in the fields as follows:
- Click Test connection, verify that the following message is displayed: A connection has been successfully created.
- In the Message window, click OK.
- In the Data Store Queries Supported by Adapter dialog box, select the following queries:
- Click Next and then Finish.
- In the Message window, click OK.
Create the Replication Job for the CMDB Changes Adapter
The result of this step is that all the relevant CIs from the UCMDB are replicated in HP Service Manager.
You create the Replication job for the CMDB Changes Adapter to synchronize the data from UCMDB to HP Service Manager.
- In BSM, access the Federated CMDB window: Admin > Universal CMDB > Settings > Federated CMDB > Replication Jobs.
- Click * to add a new replication job.
- Enter the job name in the Name field, for example UCMDB-SM CI replication.
- Enter CMDB Changes Source Adapter in the Source Data Store box.
- Enter Service Desk Target Adapter in the Target Data Store box.
- Check that the check boxes of all the queries are selected.
- Click OK to save the job.
Note: To run the job the first time you should use the full replication – all the CIs with the selector Type are forwarded to HP Service Manager. Click the Graph (pie icon) to verify that the data replicated successfully. You may schedule replication jobs in the Schedule tab in the Replication Hub page.
Create the Replication Job for the RMI Adapter
The RMI adapter should be used as a source adapter in the UCMDB-SM sync for the queries that include compound relation:
You create the Replication job for the RMI adapter to synchronize the links from UCMDB to HP Service Manager.
- In BSM, access the Federated CMDB window: Admin > Universal CMDB > Settings > Federated CMDB > Replication Jobs.
- Click * to add a new replication job.
- Enter the job name in the Name field, for example UCMDB-SM CI relations replication.
- Enter CMDB RMI Target Adapter in the Source Data Store box.
- Enter Service Desk Target Adapter in the Target Data Store box.
- Check that the check boxes of all the queries are selected.
- Click OK to save the job.
Create the Appropriate CIs in HP Service Manager
This step is performed for both the integration of Service Health with HP Service Manager and the integration of Problem Isolation with HP Service Manager. Do not perform this step for the integration of Problem Isolation with HP Service Manager if you have already performed the step for the integration of Service Health with HP Service Manager.
The integration supports only 4 Configuration Item Types (CITs): Host, Siebel Application, Application, and Business Service. Those CITs are pre-defined in BSM.
Create the CIs corresponding to these CITs in HP Service Manager.
In HP Service Manager, select Main page > To Do > Queue: Configuration Item > New > New and click:
- Application. In the Configuration Item field enter the exact name (case sensitive) of the BSM CI that corresponds to the BSM Application CIT.
- Computer. In the Configuration Item field and in the Network Name field, enter the exact host name (case sensitive) of the BSM CI that corresponds to the BSM Host CIT.
- Business Service. In the Service Display Item field and in the Service ID field, enter the exact name (case sensitive) of the BSM CI that corresponds to the BSM Business Service CIT.
- Hand Held Devices or Display Device. In the Configuration Item field enter the exact name (case sensitive) of the BSM CI that corresponds to the Siebel Application CIT.
Create the Appropriate CIs in HP Service Manager
The integration supports only 4 Configuration Item Types (CITs): Host, Siebel Application, Application, and Business Service. Those CITs are pre-defined in BSM.
Create the CIs corresponding to these CITs in HP Service Manager.
The Application, Host, and Business Service CITs are automatically created by running the replication job.
When you work with BSM, you can create the Hand Held Devices or Display Device CIT using one of the following procedures:
- In HP Service Manager, select Main page > To Do > Queue: Configuration Item > New > New and click Device. In the Configuration Item field enter the exact name (case sensitive) of the BSM CI that corresponds to the Siebel Application CIT in BSM.
- Create a new replication job that includes the Hand Held Devices or Display Device CIT. Those CITs correspond to the Siebel application CITs. For details about how to create a replication job, click here.
Result
Both products can now share information and data.
Reference
This section lists the reference information related to the integration conditions you selected earlier.
Mapping of BSM CI Types to HP Service Manager CI Types – Reference
Details
The mapping is as follows:
Integration with Alerts Using the CI Alerts Retrieval Service - Reference
This section describes the reference information.
Severity and BSM Status
The correspondence between the HP Service Manager severity and the BSM status is as follows:
BSM Alert/HP Service Manager Incident Correlation Rules
In the BSM Alert Feed process work flow, rules are used to search, create, update and close incidents.
In the table below, the columns describe the rules:
bac.ci.id = "$external.ci_id$" and product.type = "$external.kpi_name$" and problem.status <> "Closed" and problem.status <> "Resolved"
logical.name = "$external.ci_name$" and problem.type = "$external.kpi_name$" and problem.status <> "Closed" and problem.status <> "Resolved"
$external.severity$ ==0 || $external.severity$ ==5 || $external.severity$ ==10 || $external.severity$ ==15
addsave
$external.severity$ ==0 || $external.severity$ ==5 || $external.severity$ ==10 || $external.severity$ ==15
save
$external.severity$ ==20
close
Where:
- Configuration Name provides the internal name of the rule.
- Category has two values: Rules and Action. The value of the configuration with the Rules category is the real constraint. The value of the configuration with the Action category is the action (the operation that is performed when the retrieved Alert matches the corresponding rule).
- Description describes the rule. Each create, update, or close rule has a corresponding Action configuration. When a rule is considered passed, the corresponding action is performed.
- Configurationvalue describes the rule condition. If the condition is fulfilled the rule is considered to have passed. The rule is considered to have failed, if the condition is not fulfilled.
Note: All the variables between dollar ($) signs represent fields in BSM CI Status alerts. The other variables represent fields in HP Service Manager incidents.
Parameter Settings in the sm.ini File
The table lists the parameters that can be used for SSL. For details, see Configure the Security at the HP Service Manager Site – Optional or Configure the Security at the HP Service Manager Client – Optional.
BSM Setting Parameters
The default settings used in the integration are as follows:
<link href="ci?alt=application%2Fatom%2Bxml&mode=serial&from-time=2008-08-14T14%3A27%3A52%2B0300&extended-info=false" rel="next/>
You can use the link to access the rest of the alert details.
Mapping Details
This section describes the data included in the out-of-box unload file used for the customization.
Main Menu Folder
Detail Menu Items
Configuration
logical.name = "$external.ci_name$" and problem.type = "$external.kpi_name$" and problem.status <> "Closed" and problem.status <> "Resolved"Additional information: This expression follows the SQL clause grammar. This configuration is the condition for searching the incident in the database (For the legacy URL data only).
Field
Primary key in the Description column, indicates that the customization data is part of the keywords needed to identify the alert. This setting is used for fields of the BAC CI Alert type.
Required in the Description column, means that the field must have a value when the current alert is retrieved. If a required field is empty, the current alert is not retrieved. This setting is used for fields of the BAC CI Alert type.
Entity
Field Mapping
The contents of the Internal Field Callback in the Description column in the table below, provide information about the search that is performed and the results that are created. The contents of the Internal Field Callback have the following format:
<callback function>(<conditions that need to be matched>, <resulting actions>).For details about the Callback functions, see Callback Functions.
For example:
- If the contents of the Internal Field Callback are lookupCreate("producttype", "product.type=\"$bacalert.kpi_name$\" and category=\"$incident.category$\" and subcategory =\"$incident.area$\"", "product.type", ["product.type", "category", "subcategory"], ["$bacalert.kpi_name$","$incident.category$","$incident.area$"]), the lookupCreate callback is used to perform the search and attempts to find a CI for which the value of product.type field is $bacalert.kpi_name$, the value of the category field is $incident.category$ and the value of the subcategory field is $incident.area$.
- If no correlation is found, then a new items is created with the following characteristics: the value of the product.type field is $bacalert.kpi_name$, the value of the category field is $incident.category$ and the value of the subcategory field is $incident.area$. The search uses key-value pairs: the value of the product.type field is the value of the $bacalert.kpi_name$ variable.
lookupCreate("problemtype", "product.type=\"$bacalert.kpi_name$\" and problem.type=\"$bacalert.kpi_name$\" and limited.given.level2 =\"$incident.subcategory$\"", "problem.type", ["product.type", "problem.type", "limited.given.level2"], ["$bacalert.kpi_name$","$bacalert.kpi_name$","$incident.subcategory$"])For details, see LookupCreate Function.
subcategory
resolution
setValue("close", "$bacalert.actual_description$")For details, see setValue Function.Note: Do not modify.
resolution.code
setValue("close", "User Closure")For details, see setValue Function.
setValue("close","permanent")For details, see setValue Function.
lookup("device", "logical.name=\"$bacalert.ci_name$\" and type=\"$incident.type$\"", "contact.name")For details, see Lookup Function.
impact
lookup("producttype", "product.type=\"$bacalert.kpi_name$\" and category=\"$incident.category$\" and subcategory =\"$incident.subcategory$\"", "severity")For details, see Lookup Function.
lookup("device", "logical.name=\"$bacalert.ci_name$\" and type=\"$incident.type$\"", "vendor")For details, see Lookup Function.
lookup("device", "logical.name=\"$bacalert.ci_name$\" and type=\"$incident.type$\"", "site.category")For details, see Lookup Function.
lookup("producttype", "product.type=\"$bacalert.kpi_name$\" and category=\"$incident.category$\" and subcategory =\"$incident.subcategory$\"", "assignment")For details, see Lookup Function.
setValue("close", "Creation time: $bacalert.creation_time$\nAlert Name: $bacalert.alert_name$\nActual Description: $bacalert.actual_description$\nUser Description: $bacalert.user_description$\nCondition Configuration: $bacalert.condition_configuration$")For details, see setValue Function.Note: Do not modify.
combine(["bacalert.alert_name", "bacalert.actual_description"], false, " : ")For details, see combine Function.
lookupEmpty("device", "logical.name=\"$bacalert.ci_name$\" and type=\"$incident.type$\"", "logical.name")For details, see LookupEmpty Function.
lookup("device", "logical.name=\"$bacalert.ci_name$\" and type=\"$incident.type$\"", "type")For details, see Lookup Function.Value Mapping Group: citypeGroupNote: Do not modify.
lookupCreate("producttype", "product.type=\"$bacalert.kpi_name$\" and category=\"$incident.category$\" and subcategory =\"$incident.subcategory$\"", "product.type", ["product.type", "category", "subcategory"], ["$bacalert.kpi_name$","$incident.category$",
"$incident.subcategory$"])For details, see LookupCreate Function.
setValue("insert|update")For details, see setValue Function.
Value Mapping
Callback Functions
This section describes the functions that are invoked to assign values to the fields in HP Service Manager.
Lookup Function
lookup ("device", "ucmdb.id = \"$ bacalert.ci_id \"$ || logical.name=\"$bacalert.ci_name$\"", "contact.name")
LookupCreate Function
lookupCreate ("producttype", "product.type=\"$bacalert.kpi_name$\" and category=\"shared infrastructure\" and subcategory =\"enterprise\"", "product.type", ["product.type", "category", "subcategory"], ["$bacalert.kpi_name$","shared infrastructure","enterprise"])
LookupEmpty Function
lookupEmpty ("device", "logical.name=\"$bacalert.ci_name$\"", "logical.name")
setValue Function
Example 1: setValue ("close", "$bacalert.actual_description$")
Example 2: setValue("close|update", "description");
combine Function
Combine (["bacalert.alert_name", "bacalert.actual_description"], false, "| ")
Integration with Alerts Using the CI Alerts Retrieval Service - Reference
Severity and BSM Status
The correspondence between the HP Service Manager severity and the BSM status is as follows:
BSM Alert/HP Service Manager Incident Correlation Rules
In the BSM Alert Feed process work flow, rules are used to search, create, update and close incidents.
In the table below, the columns describe the rules:
bac.ci.id = "$external.ci_id$" and product.type = "$external.kpi_name$" and problem.status <> "Closed" and problem.status <> "Resolved"
logical.name = "$external.ci_name$" and problem.type = "$external.kpi_name$" and problem.status <> "Closed" and problem.status <> "Resolved"
$external.severity$ ==0 || $external.severity$ ==5 || $external.severity$ ==10 || $external.severity$ ==15
addsave
$external.severity$ ==0 || $external.severity$ ==5 || $external.severity$ ==10 || $external.severity$ ==15
save
$external.severity$ ==20
close
Where:
- Configuration Name provides the internal name of the rule.
- Category has two values: Rules and Action. The value of the configuration with the Rules category is the real constraint. The value of the configuration with the Action category is the action (the operation that is performed when the retrieved Alert matches the corresponding rule).
- Description describes the rule. Each create, update, or close rule has a corresponding Action configuration. When a rule is considered passed, the corresponding action is performed.
- Configurationvalue describes the rule condition. If the condition is fulfilled the rule is considered to have passed. The rule is considered to have failed, if the condition is not fulfilled.
Note: All the variables between dollar ($) signs represent fields in BSM CI Status alerts. The other variables represent fields in HP Service Manager incidents.
Parameter Settings in the sm.ini File
The table lists the parameters that can be used for SSL. For details, see Configure the Security at the HP Service Manager Site – Optional or Configure the Security at the HP Service Manager Client – Optional.
BSM Setting Parameters
The default settings used in the integration are as follows:
<link href="ci?alt=application%2Fatom%2Bxml&mode=serial&from-time=2008-08-14T14%3A27%3A52%2B0300&extended-info=false" rel="next/>
You can use the link to access the rest of the alert details.
Mapping Details
This section describes the data included in the out-of-box unload file used for the customization.
Main Menu Folder
Detail Menu Items
Configuration
logical.name = "$external.ci_name$" and product.type = "$external.kpi_name$" and problem.status <> "Closed" and problem.status <> "Resolved"Additional information: This expression follows the SQL clause grammar. This configuration is the condition for searching the incident in the database (For the legacy URL data only).
Field
Primary key in the Description column, indicates that the customization data is part of the keywords needed to identify the alert. This setting is used for fields of the BAC CI Alert type.
Required in the Description column, means that the field must have a value when the current alert is retrieved. If a required field is empty, the current alert is not retrieved. This setting is used for fields of the BAC CI Alert type.
Entity
Field Mapping
The contents of the Internal Field Callback in the Description column in the table below, provide information about the search that is performed and the results that are created. The contents of the Internal Field Callback have the following format:
<callback function>(<conditions that need to be matched>, <resulting actions>).For details about the Callback functions, see Callback Functions.
For example:
- If the contents of the Internal Field Callback are lookupCreate("producttype", "product.type=\"$bacalert.kpi_name$\" and category=\"$incident.category$\" and subcategory =\"$incident.area$\"", "product.type", ["product.type", "category", "subcategory"], ["$bacalert.kpi_name$","$incident.category$","$incident.area$"]), the lookupCreate callback is used to perform the search and attempts to find a CI for which the value of product.type field is $bacalert.kpi_name$, the value of the category field is $incident.category$ and the value of the subcategory field is $incident.area$.
- If no correlation is found, then a new items is created with the following characteristics: the value of the product.type field is $bacalert.kpi_name$, the value of the category field is $incident.category$ and the value of the subcategory field is $incident.area$. The search uses key-value pairs: the value of the product.type field is the value of the $bacalert.kpi_name$ variable.
lookupCreate("producttype", "product.type=\"$bacalert.kpi_name$\" and category=\"$incident.category$\" and subcategory =\"$incident.area$\"", "product.type", ["product.type", "category", "subcategory"], ["$bacalert.kpi_name$","$incident.category$","$incident.area$"])For details, see LookupCreate Function.
resolution.code
setValue("close", "User Closure")For details, see setValue Function.
impact
lookup("producttype", "product.type=\"$bacalert.kpi_name$\" and category=\"$incident.category$\" and subcategory =\"$incident.subcategory$\"", "severity")For details, see Lookup Function.
assignment
setValue("close", "Creation time: $bacalert.creation_time$\nAlert Name: $bacalert.alert_name$\nActual Description: $bacalert.actual_description$\nUser Description: $bacalert.user_description$\nCondition Configuration: $bacalert.condition_configuration$")For details, see setValue Function.Note: Do not modify.
combine(["bacalert.alert_name", "bacalert.actual_description"], false, " : ")For details, see combine Function.
lookupEmpty("device", "ucmdb.id=\"$bacalert.ci_id$\" || (logical.name=\"$bacalert.ci_name$\" and type=\"$incident.type$\" ) ", "logical.name")For details, see LookupEmpty Function.
lookup("device", "ucmdb.id=\"$bacalert.ci_id$\" || (logical.name=\"$bacalert.ci_name$\" and type=\"$incident.type$\")", "type"For details, see Lookup Function.Value Mapping Group: citypeGroupNote: Do not modify.
setValue("insert|update")For details, see setValue Function.
Value Mapping
Callback Functions
This section describes the functions that are invoked to assign values to the fields in HP Service Manager.
Lookup Function
lookup ("device", "ucmdb.id = \"$ bacalert.ci_id \"$ || logical.name=\"$bacalert.ci_name$\"", "contact.name")
LookupCreate Function
lookupCreate ("producttype", "product.type=\"$bacalert.kpi_name$\" and category=\"shared infrastructure\" and subcategory =\"enterprise\"", "product.type", ["product.type", "category", "subcategory"], ["$bacalert.kpi_name$","shared infrastructure","enterprise"])
LookupEmpty Function
lookupEmpty ("device", "logical.name=\"$bacalert.ci_name$\"", "logical.name")
setValue Function
Example 1: setValue ("close", "$bacalert.actual_description$")
Example 2: setValue("close|update", "description");
combine Function
Combine (["bacalert.alert_name", "bacalert.actual_description"], false, "| ")
CI Alert Retrieval Service Invocation Report - User Interface
This section describes the user interface.
Description
- To display the report in HTML format, use: http://<server>/topaz/services/technical/customers/1/alerts/ci?alt=text%2Fhtml
- To display the report in XML format, use: http://<server>/topaz/services/technical/customers/1/alerts/ci?alt=application%2Fatom%2Bxml
- To display the report in JSON format, use: http://<server>/topaz/services/technical/customers/1/alerts/ci?alt=application%2Fjson
Report Content
Click to enlarge the report in HTML format.
Click to enlarge the report in XML format.
Click to enlarge the report in JSON format.
The following elements are included (unlabeled GUI elements are shown in angle brackets):
- author displays the name of the Alerts Engine (always HP BAC Alerts Engine).
- category (only in XML or JSON format) lists the severity of the alert. For details, see Severity and BSM Status.
- content displays information about the alert. For details about the displayed information, see Content Description.
- expiration (only in HTML format) is empty.
- id displays the ID of the alert instance.
- scheme (only in HTML or XML format) displays the list of severities that the alert instance may have.
- summary provides a summary of the condition that occurred and caused the CI Status alert to be triggered.
- title (only in XML or JSON format) displays the alerts's name.
- published (only in XML or JSON format) displays the time when the alert was triggered in BSM.
- generator. The version of the Alerts Engine in HTML or JSON format and the URI and the version and name of the Alerts Engine in XML format.
- id. The permanent URI where the feed can be read.
- links. (in XML or JSON format) See the row describing the links in this table.
- Next link or next. This field is returned if during the query time period, more alerts exist than the maximum alerts allowed in the response (500). The field is used as a link for paging to the next 500 alerts.
- title. (only in XML and JSON format) Always Alerts List.
- updated. The field returns the index of the last alert included in the feed (the time when the most recent alert was retrieved from BSM by HP Service Manager). The next invocation starts retrieving alert information from the time specified in the Updated field. If the alert's REST invocation is empty, the updated field returns the value of the from-time field.
Content Description
The alert details section or tag includes the following information:
(A - Z)
description
configuration
Troubleshooting and Limitations For the Integration of HP Service Manager With Service Health and Service Level Management
This section provides troubleshooting and limitations information for the integration of HP ServiceCenter/HP Service Manager with Service Health and Service Level Management.
Severity Change in an Incident
An incident in HP Service Manager that changes its severity from low to high is not included in the Number of Tickets KPI in BSM. To include the incident, re-synchronize the SiteScope monitor in the EMS Integration administration.
Changes to the Thresholds of the Number of Open Incidents KPI
If you modify the thresholds of the Number of Open Incidents KPI in Service Health administration, the value displayed by the Number of Open Incidents KPI in Service Health views is 0 as the number of incidents is reset.
Problem
All the SiteScope samples that are sent to BSM provide the number of changes that were added after SiteScope ran the last time before you modified the threshold.
Solution
Enable the Sync flag of the SiteScope monitors – after you have changed the threshold – to re-import all the changes that happened before you changed the threshold.
Inaccurate Forecast Results
The Forecast information for SLAs, which include incident-related KPIs whose status is imported from HP Service Manager using the HP Service Manager monitor, is not correct.
Incident Ignored by EMS
When opening an incident in HP Service Manager, if you manually enter the name of the affected CI in the Affected CI box instead of using the Fill button, the incident is ignored by EMS.
Troubleshooting and Limitations For the Integration With Alerts Using CI Alert Retrieval Service
This section describes how to troubleshoot HP Service Manager deployment.
BSM Integration
Security (SSL)
Manually Install Out-of-Box Unload
All the configurations listed in this section are provided by the out-of-box unload (see "Perform the Automatic Default Configuration" in "Open Incidents Using the CI Alert Retrieval Service – Task" on page 100) and typically require no modifications.
The sections below represent steps that serve as a reference and are only required if the Out-of-box unload is not used or requires modification.
Manually Add a Menu
The configuration described in this section is provided by the out-of-box unload (see "Perform the Automatic Default Configuration" in "Open Incidents Using the CI Alert Retrieval Service – Task" on page 100) and typically require no modifications.
This section's steps serve as a reference and are only required if the Out-of-box unload is not used or requires modification.
This step describes how to add the Main Menu.
- Enter menu in the HP Service Manager command line.
- Go to the Menu page.
- Enter SYSTEM ADMINISTRATION in the Menu Name box and click ENTER or Search to search the menu list.
- Add the data in Main Menu Folder as one record to the SYSTEM ADMINISTRATION menu.
- Click Save.
Click here to see an example of the main menu records.
Manually Add a Details Menu
The configuration described in this section is provided by the out-of-box unload (see the step Perform the Automatic Default Configuration in "Open Incidents Using the CI Alert Retrieval Service – Task") and typically require no modifications.
This section's steps serve as a reference and are only required if the Out-of-box unload is not used or requires modification.
This step describes how to add the Details Menu.
- Type menu in the HP Service Manager command line.
- Go to the Menu page.
- Type SMBAC Alert Integration in the Menu Name box, and type menu.gui.base.bacalert in the Format box.
- Click Add button to add this as a new menu.
- Add the data in Detail Menu Items as the records to the new menu.
- Click Save.
The details menu records is as follows:
Manually Maintain a BAC Alert Integration Entity
The configuration described in this section is provided by the out-of-box unload (see the step Perform the Automatic Default Configuration in "Open Incidents Using the CI Alert Retrieval Service – Task") and typically require no modifications.
This section's steps serve as a reference and are only required if the Out-of-box unload is not used or requires modification.
This step describes how to maintain the Entity. For information about the possible values, see Entity.
Manually Maintain the BAC Alert Integration Field
The configuration described in this section is provided by the out-of-box unload (see the step Perform the Automatic Default Configuration in "Open Incidents Using the CI Alert Retrieval Service – Task") and typically require no modifications.
This section's steps serve as a reference and are only required if the Out-of-box unload is not used or requires modification.
This step describes how to maintain the Field. For information about the possible values, see Field.
Click Menu Navigation > System Administration > Base System Configuration > BAC Alert Integration > BAC Alert Integration Field:
When you select the field type, take into consideration the real data type in file (table). Take the Field with the incident.citype id for example, you should check the real data type of the type field name in the probsummary file (select System Definition > Tables > probsummary) and match the real data type in the table (string, number, date, or Boolean).
The Max string length and multivalue attributes are for future use.
Note: If you add a new field to the table and configure it to the Field Mapping, you must restart the scheduler (as shown in step "Manually Create Schedule" on page 318) to populate the new field.
Manually Maintain the BSM Alert Integration Field Mapping
The configuration described in this section is provided by the out-of-box unload (see the step Perform the Automatic Default Configuration in "Open Incidents Using the CI Alert Retrieval Service – Task") and typically require no modifications.
This section's steps serve as a reference and are only required if the Out-of-box unload is not used or requires modification.
This step describes how to maintain the Field Mapping. For information about the possible values, see Field Mapping and Value Mapping.
- To add one Field Mapping, fill the Id box, select one value from the drop list of externalEntityType and internalEntityType, for the cells in the picture below: select one value in External Field ID drop list, select one value in Internal Field ID, fill the Internal Field Callback and fill the other cells if needed, and click Add button to add the new Field mapping.
Note: When you add a new Field Mapping, select only the values available in the externalEntityType list (BAC CI Alert) and internalEntityType list (SM Incident). You cannot modify those values.
- To update one Field Mapping, get the target Field Mapping record via search system, modify the any fields value or table cells value, or add records to the Field Mapping and Value Mapping tables, and click Save to save the modification.
- To remove one Field Mapping, get the target Field Mapping record via search system, and click Delete to remove the modification.
Example of adding one field mapping:
Example of field mapping:
Manually Create Schedule
The configuration described in this section is provided by the out-of-box unload (see the step Perform the Automatic Default Configuration in "Open Incidents Using the CI Alert Retrieval Service – Task") and typically require no modifications.
This section's steps serve as a reference and are only required if the Out-of-box unload is not used or requires modification.
This step describes how to maintain the Schedule. The schedule is used to start up the process.
Click Menu Navigation > Tailoring > Database Manager, type schedule.looksee in the Form field and click ENTER, you are automatically directed to the Search Schedule Records page. In this page, either search for a schedule or fill out the details of the new schedule as described in the following table, and click Add when you have completed the task:
bacClient.startup();
Manually Customize the Link
To update the expression of the contact.name field and the two logical.name fields as Source Field Name:
- Click Tailoring > Tailoring Tools > Links.
- Type probsummary as the Name and click Search.
- Find the line with contact.name as the Source Field Name.
- Right-click this line and select Select Line in the Detail Options menu in the top right-hand corner of the page.
- Modify the contact.name expression.
- Add one clause expression:
;if (nullsub($G.BACAlert, false)=true) then ($fill.recurse=false) else ($fill.recurse=true)- Modify the expressions of the two logical.name fields using the steps above.
Modify the condition of the im.first Processes
This step describes how to modify the condition of the im.first Processes.
- Click System Administration > Tailoring > Document Engine > Processes.
- Enter im.first in the Process Name field and click Search.
- Check the expression in the Initial Expressions tab. Change the condition from: if ((operator()="problem" or operator()="EXTERNAL") and $G.bg) then ($L.add=true) else ($L.add=nullsub(evaluate(scm.add.condition in $L.object), false))
to:
$L.add=nullsub(evaluate(scm.add.condition in $L.object), false)
| © Copyright 2009-2010 Hewlett-Packard Development Company, L.P. |
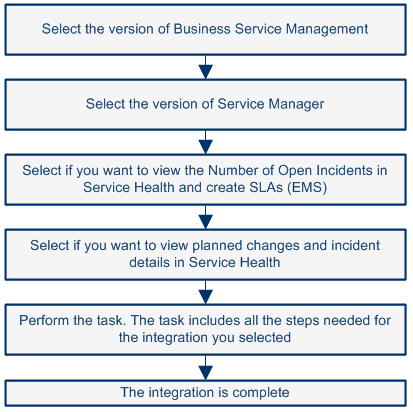
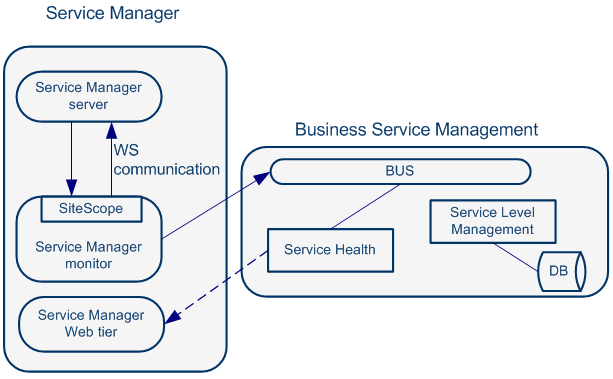
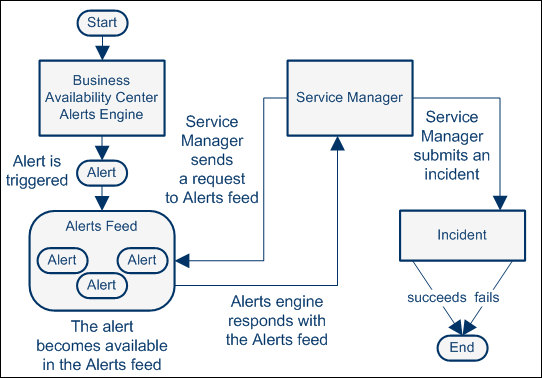
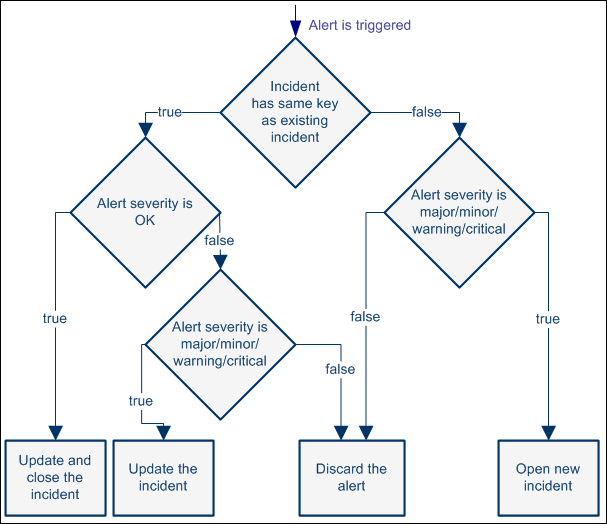
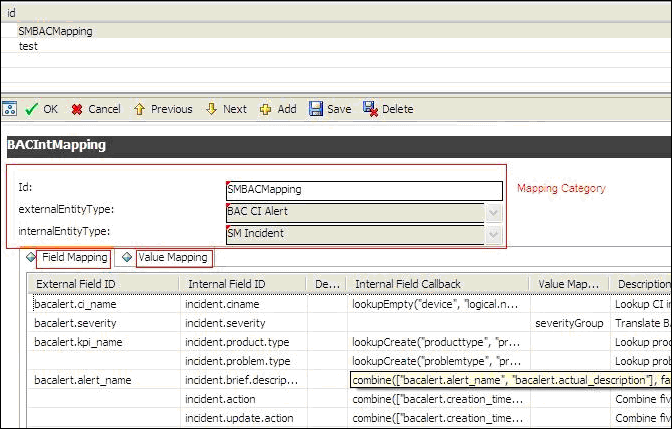
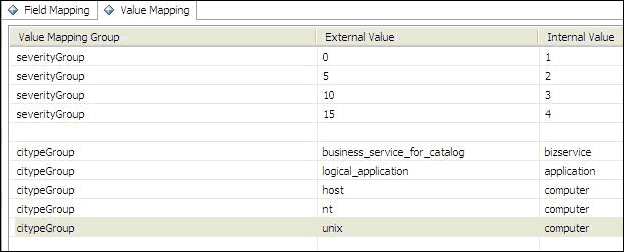
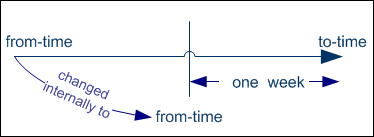

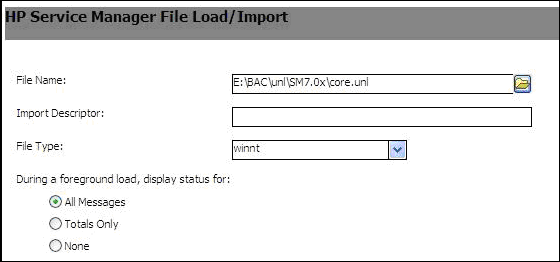
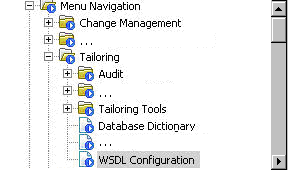
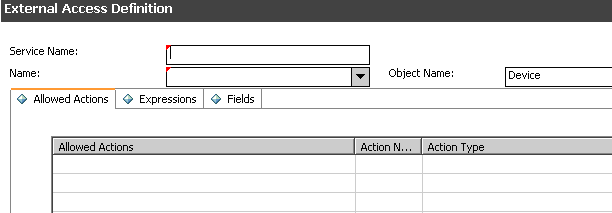
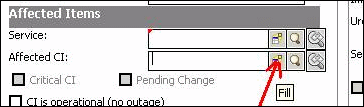

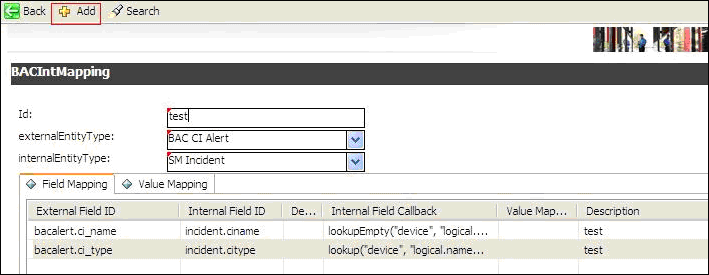
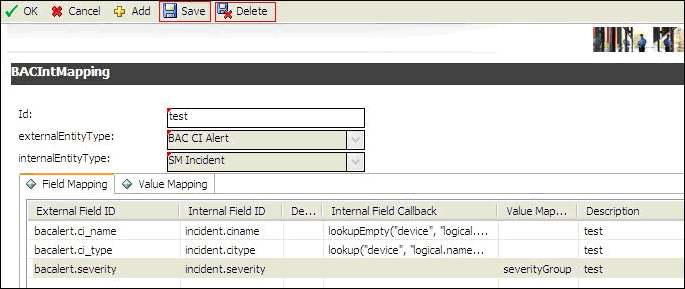
)
)
)
)
)